Anatomy of an Ayesha
- Simone Muscat

- Dec 18, 2020
- 11 min read
Updated: Sep 17, 2025
December 19th, 2020
Updated: February 9th 2025
When I was a baby poler watching the advanced polers, I wanted nothing more than to unlock an Ayesha! It was the big dream for me. I remember thinking, the day I can do this trick, is the day I can happily give up pole knowing I did good. Haha! Of course I became very quickly addicted to pole instead and now have no intention of ever giving it up!
But still, that moment of achieving your first Ayesha is something so special, and something I worked a long time for. I remember being more than strong enough to perform an Ayesha at the time, but for some reason the move just wasn’t clicking! So, I stepped back and put my physio hat on and realised exactly what I was missing! A few quick tweaks to my technique and a focus on some very targeted off the pole conditioning, and just like magic, everything clicked and I unlocked my first Ayesha.
So, I’m going to now share all my physio knowledge and break down the anatomy of an Ayesha, in the hope you can nail yours too!
It’s easy to get daunted by the Ayesha. And to be honest, there are SOOOO many requirements that need to work together to perform an Ayesha correctly. For this move we require:
180 degrees of shoulder mobility
Good shoulder stability
Overhead pushing and horizontal pulling strength
Strong and mobile elbows and wrists
Abdominal anti-rotation strength
Good hamstring and neural length
Good hip flexion and abdominal flexion strength
And finally good proprioception (body awareness) of where you are in space because everything from our wrists, elbows, shoulders and hips need to stack up correctly!
Let’s break the anatomy of this trick and each of these requirements down step by step:
Shoulder Range of Motion
To Ayesha correctly, our bottom arm requires 180 degrees of true overhead movement, whilst the top arm requires only about 110 degrees. This range of motion required from the bottom arm is a constant in all Ayeshas, regardless of the grip you’re using.
Now what do I mean by the words ‘true overhead movement’? Well we can ‘cheat’ and provide extra shoulder range by flaring our ribcage and using our upper back mobility to make up the 180 degrees of required movement. However to perform an Ayesha correctly no flaring should occur otherwise we may increase our risk of injury. The easiest way to test if you have 180 degrees of true shoulder mobility needed for your Ayesha is by tucking yourself in a ball against a wall with the ribcage flat as shown, and reaching the arm overhead.
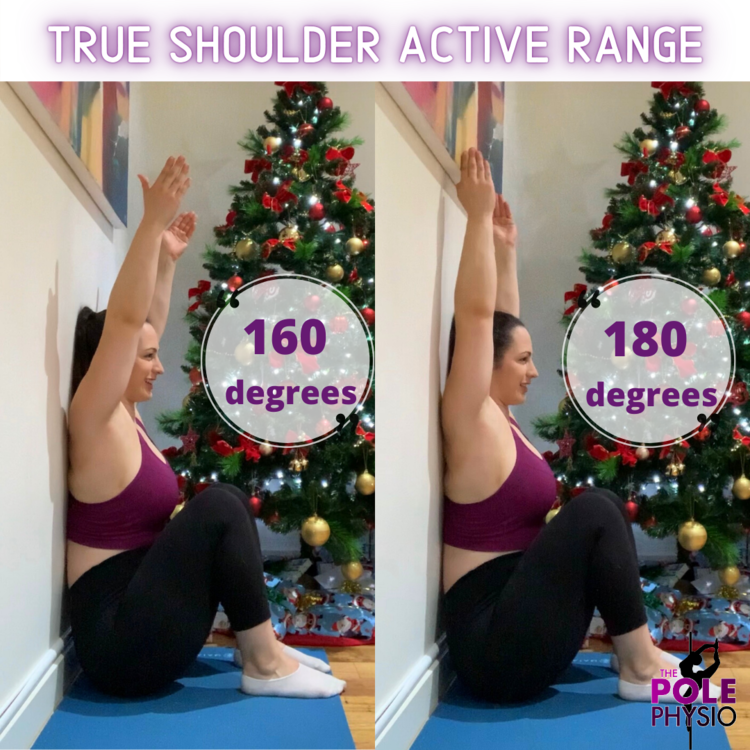
If this shoulder range of motion is lacking, then our body won’t stack efficiently in our Ayesha and we will start to tip out of our Ayesha sideways as shown below. Now, if you want some helpful ways to improve shoulder range of motion and strength in our Ayesha, make sure you check out our socials or even better, work with one of our online physios to improve your shoulder range of motion!

Shoulder Passive and Active Stability
It’s fair to say that our Ayesha is an uneven handstand. All of our weight is dispersed through our arms whilst they perform different movements; one pulling and the other pushing. To perform such an intense movement, we require great active and passive stability of the shoulder joints. In day to day life, our shoulders usually don’t bear too much weight, so to flip our body upside down and load them the way we do in our Ayesha makes for a very interesting time! So let’s break down these two very important concepts of stability:
Passive Stability

The shoulder is an inherently unstable joint, with the humeral head (shoulder) placed on the glenoid which is about 1/3rd of its size. For a quick visual, imagine a golf ball sitting on a tee. The golf ball being our shoulder sitting in the shoulder joint on the tee.
There’s a few key things that help keep our joint in this position. The first being the joint capsule which creates this vacuum effect to keep the shoulder in its socket. The second being the ligaments that surround the joint. These ligaments are fairly relaxed when our arms are by our side, but as we lift the arm overhead our ligaments become taught and act as a main stabiliser for our shoulder joint. Without our ligaments and joint capsule, our shoulder joint is unstable and we would guarantee you, it would dislocate in an Ayesha!
So it’s these passive structures that help us enter and sustain an Ayesha. But wait… there’s more to it!
Active Stability/Deep Shoulder Strength
Coupled with our passive shoulder stability, we require active stability of the shoulder too!
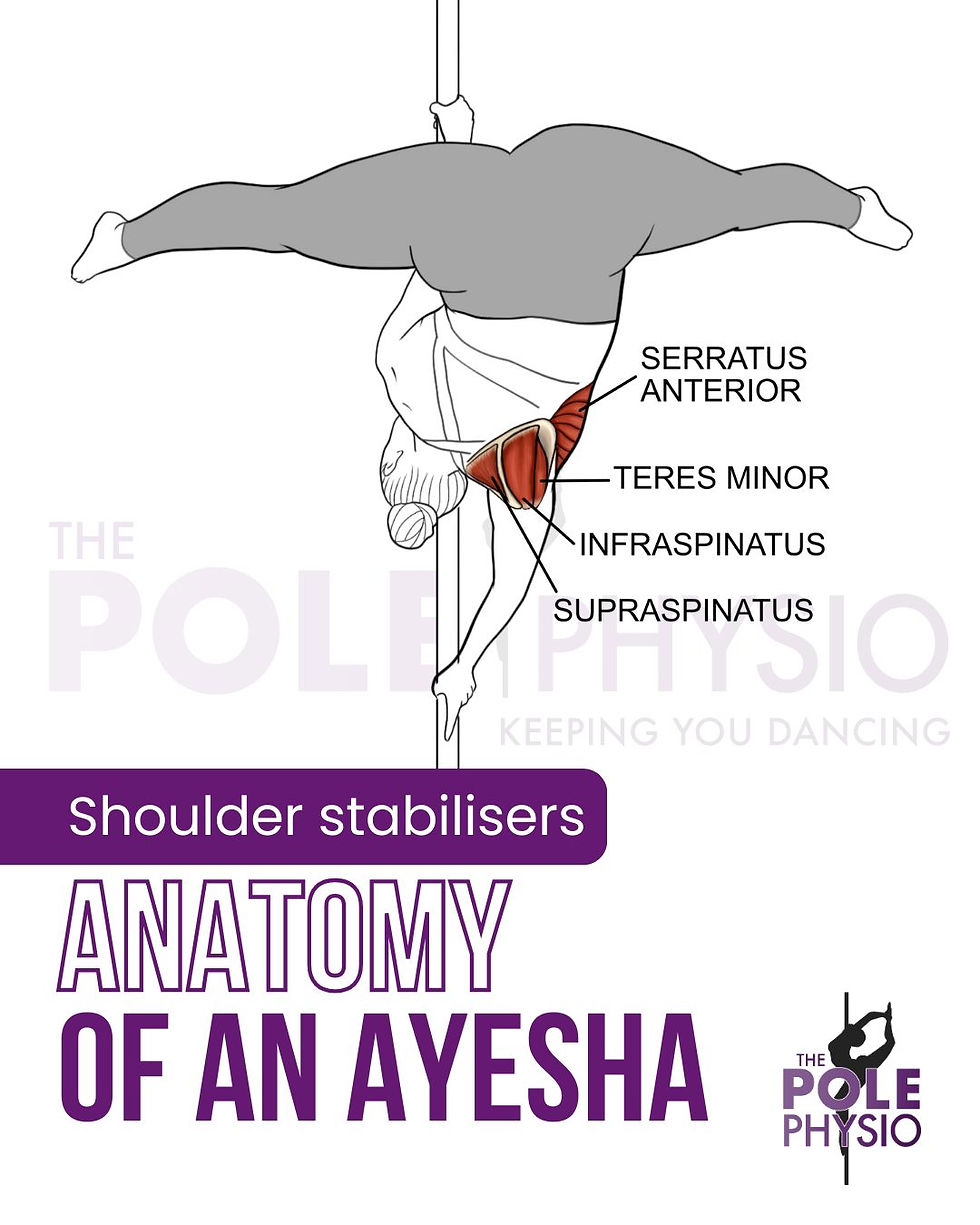
Regardless of whether it’s the top or bottom arm, our shoulder stabilising muscles are working their butt off in an Ayesha. Our upper >lower trapezius, rhomboid, levator scapulae, and serratus anterior are busy elevating and stabilising the shoulder blade, whilst the rotator cuff (supraspinatus, infraspinatus, teres minor and subscapularis) are busy stabilising the actual shoulder in the socket whilst placed overhead. Phew! So much work being done in our shoulder joint before you even add the pulling or pushing components of the Ayesha!
For most of you, I’ve probably just spoken a foreign language. So check out each of these muscles as shown in the diagram along with their direction of pull shown below.


Overhead Push and Horizontal Pull

So, we have our shoulder range of motion, our passive shoulder stability and active shoulder stability. Surely that’s all we need right? Wrong! We of course need our big mover muscle strength too!
Quite simply, the bottom arm needs to push and our top arm needs to pull in an Ayesha, all whilst our shoulder joint is been stabilised.
Pushing Arm
To be able to effectively push we require maximal effort from our triceps, anterior and middle deltoid, pectoralis major and minor of our bottom arm whilst in an overhead position. Not asking for much right?
Pulling Arm

And the pulling muscles of our top arm are effectively the opposite of the pushing muscles in our bottom arm. Makes sense! The pulling muscles we need are our: biceps, middle and posterior deltoid, trapezius, rhomboids, and latissimus dorsi.
As mentioned earlier, our top arm is placed at maximum 110 degrees of shoulder elevation, so when it pulls, it pulls us horizontally, like a rowing motion.
Now, the different grip positions do slightly change the requirements of our pulling arm by engaging the wrist and forearm muscles in a different way (we’ll chat about this later), but the main shoulder principles stay the same.
But enough with the shoulders! What’s going on in the rest of our body?
Elbows and Wrists
An Ayesha can be done with a slightly bent top arm if required for a greater bicep activation. We often encourage our students/patients to think about bending their elbow when in true grip! (Often this is what a lot of students are missing!)
The bottom elbow requires 180 degrees of extension in this position, and a strong push produced by the triceps to hold our bodies upside down. Our bottom wrist requires approximately 30 degrees of wrist extension and 20 degrees of ulnar deviation. Wrist pain in an Ayesha isn’t uncommon, but can be slightly amended by modifying the grip position into a neutral wrist position as shown.


Different Ayesha Grips
A change in grip positions on the pole changes what muscles are predominantly being used in the wrist and forearm, and has flow on effect at the shoulder joint.
Straight Grip
The key point of importance in this grip is that our forearm is in a supinated position. Our bicep is a particularly powerful supinator of the forearm in addition to being an important pulling muscle of the shoulder, which is why this grip position feels easier than cup grip.
Cup Grip
Cup grip places the forearm in a pronation position which is a harder position for our bicep (the main pulling muscle) to activate. Not to mention we loss the thumb grip around the pole opposing the fingers in our cup grip. So we need really strong forearm and back muscles for this position. Which is why this grip can feel so challenging for many! But it does have its upsides; this grip maintains a neutral (non-rotated) position for the wrist, the shoulder isn’t placed into internal rotation unlike twisted grip and it is performed with a slightly bent arm which requires less shoulder range of motion than twisted grip.
Twisted Grip
Lastly, our twisted grip requires pronation of our forearm, and most importantly internal rotation of the shoulder. Twisted grip is discussed in more detail in this blog here.
In twisted grip the arm is straight and in a closed pack position (flexion and internal rotation), which can give our body can have a sense of feeling stronger and more supported than usual. A lot of students report feeling more secure in this grip when starting. Or like they have more strength in this grip. However, this grip can bring a fake sense of security and if we aren’t strong in our stabilising muscles in this position (that our being placed in a lengthen positioned), we can risk shoulder injury. So moral of the story.. get strong and work towards feeling confident in all types of grips.


Where do I look??
Until you are strong enough to start looking around, we would suggest to look up to your top hand on the pole. This keeps your neck in line with your body and can help to visually improve your sense of engagement through the top arm. Avoid looking at the floor as it may increase neck discomfort or strain.

Anti-Rotation, abdominal engagement and hip flexion
Well done for getting it this far through the blog! We are finally past the upper body!! Time for the trunk.

When we are finally strong enough to take our legs off in an Ayesha, there can be a sense of our body wanting to cartwheel or fall out of this position towards our bottom arm leg. Well, this is where a really strong pull through the top arm (biceps) and good anti-rotation strength come in handy.
Anti-rotation is our abdominals’ ability to resist a motion. So, in this case, anti-rotation is the ability to resist the desire to cartwheel out of the Ayesha. To resist this pull we need to actively engage our abdominals muscles, especially the obliques that sit on the side of the top arm. A simple cue to help this is to first focus on actively bringing the leg on the side of the top arm down towards the chest via our lower abdominals/hip flexors in your set up.
Once you feel comfortable and confident in your Ayesha balance, then you can focus on actively engaging both hip flexors and quads down to the floor.
Other muscles that we use to perform our Ayesha are our hip abductors & external rotators (glutes!). These muscles control how wide a part our legs sit and the rotation of our hips in space. The distance of the legs from each other however does not make or break our Ayesha.
Am I flexy enough through my back and hamstrings?

Most likely yes! An Ayesha does require a beautiful hip pike and gravity does help slightly in this position to bring the legs down to the chest. The great news is that most humans have enough natural flexibility to perform an Ayesha, even if they can’t get their feet in line with their hips when they start.
Ideally we should have 135 degrees of hamstring flexibility to perform this trick, but it can certainly be done with less. This movement may be limited by hamstring length, but also and more commonly neural (nerve) mobility.
The nervous system is the body's communication system and controls our ability to speak, move, feel etc. There are around 7 trillion nerves in our body. However some particularly important ones which control our leg movement and sensation are located in the spinal column and travel down the back of our legs. In our Ayesha position, these nerves are placed on stretch. And the more flexible these nerves (and muscles) are, the closer we can bring our legs to the ground in our Ayesha. If you’re someone who struggles with hamstring or nerve flexibility, then make sure you work with a member of our online team to help.
The tipping point
The last thing our body needs to perform an Ayesha is really good spatial awareness known as proprioception. Because let’s face it, being upside down can absolutely muck with your mind. So when setting up for an Ayesha, we encourage a well centred stack of the body. Changes to our centre of balance when setting up for this trick, can increase load through joints in a way that makes it more challenging to sustain, so it’s helpful to keep a strong stack when setting up.


A number of instructors often encourage a side bend of the trunk when first learning an Ayesha, tipping the torso significantly towards the top arm. Whilst this can be helpful when first learning, it can result in increased reliance on passive stability of the spine and shoulders, and focus less on active muscle recruitment. This is less so our preference as it is more likely to lead to injury. Instead we would encourage strong engagement of all muscles and a mostly neutral spinal stack to hold our Ayesha. We tend to avoid considerable side bending of this position when first learning to encourage long term good engagement behaviours.
Pencil
Once your Ayesha is mastered, you can attempt your pencil. It’s another one of those epic feel good moves! It’s generally more challenging to hold a pencil because the balance point is quite narrow. All muscle activation stays the same in this position with the exception of the hip flexors which are no longer required. Instead our glutes become our powerhouse muscles here, and bring our hips into a neutral stacked alignment.

Roadmap to Ayesha
Wondering how you work up to your Ayesha? This is the roadmap we recommend (below).
You may notice that we suggest gaining your Ayesha via a Jamilla and not a basic Straddle entry. Our rationale behind this is this transition requires considerable overhead strength of the bottom arm and proprioception to shift the body from a horizontal position of a Jamilla to the upside-down position of a Butterfly. This transition helps to ensure you are actively engaging your shoulders correctly and not hanging out of your top arm. Being safe & confident in this position first significantly builds confidence towards the Ayesha.

Check out these great videos of Mischka below demonstrating each of the stages:
Screening for your Ayesha
Ever wondered "am I ready for my Ayesha???" Well if you are feeling super strong & confident in your jamilla to pike (apprentice to inverted D) transition, then you're probably thinking about levelling up to your Static V!
But how do you know if you're strong enough to handle the demands of this move? We’ve put together this quick & easy pole screening checklist to work on prior to learning your Ayesha with your instructor:
Straddle to Extended Butterfly
Jamilla to Pike
180 degrees of true shoulder flexion
60+ degrees of shoulder internal rotation in supine (90 degrees when overhead)
80+ degrees of forearm pronation
Overhead external rotation strength - break the bar - 3 x 8
Overhead pushing strength - single arm down dog - 3 x 10 each side
Horizontal pulling strength - incline rows - 3 x 8 each side
Anti-rotation strength - elbow plank taps - 2 x 20
And don't forget a strong foundation off the pole will help you nail this move in the safest and quickest way possible. Pass this checklist first and then you know you're in good stead to control your Ayesha.
And there you have it! YOU MADE IT!
The most comprehensive review of the Ayesha going around. Every in and out that you could possibly need, summarised in one epic blog! We hope you enjoyed nerding out on Ayesha anatomy as much as we do.
Have you been struggling to nail your Ayesha but not sure why? Or recovering with an injury and it’s getting in the way of your pole?
Online telehealth appointments can be booked with the Pole Physio via our ‘Book Online’ page that can be found here. Assessment and tailored rehabilitation are provided in accordance with best practice and evidence-based treatment to help you unleash your 'poletential'.
Until next time, train safe.
The Pole Physio
x
Please Note:
Any artwork on this or other pages of https://www.thepolephysio.com is copyrighted and is not be reproduced without written permission per the terms of use and conditions.
An Ayesha is an advanced trick and conditioning should ONLY be undertaken if your instructor has deemed you ready to work on this trick. This information is general advice only and we are not liable for any injuries that may occur during training.
This page has been created to provide wonderful knowledge with the pole community and sharing of this page to pole friends and pole related facebook groups is actively encouraged.


I remember feeling exactly the same about my first Ayesha—it seemed impossible even when I had the strength for it. What finally helped was refining my technique and focusing on specific conditioning drills, and suddenly it clicked. Kind of like beating a tough level in an FNF game, sometimes one small adjustment makes all the difference.
I tried doing a small withdrawal just to understand the process after using Yay Win Login and it was completed on the same day through UPI. Just wanted to confirm if the timing is always similar for everyone or if it depends on the amount and verification.
I found TC Lottery Gift Code useful while practicing MATLAB problems, especially for understanding logic errors and improving my coding approach.
Vry useful information for anyone trying the KWG Game Gift Code process for the first time. The instructions are easy to follow.
I’m seeing Jai Club Register mentioned in a few places, so I wanted to check it out. Before using it regularly, can anyone confirm if it works properly on Android devices and whether it requires any verification