Anatomy of a Handspring and Deadlift
- Simone Muscat

- Feb 5, 2021
- 13 min read
Updated: Jan 1
February 6th, 2021
Updated: January 1st, 2026
After covering our Ayesha in such incredible depth in our previous blog, it naturally makes sense to continue our anatomy series by progressing onto our Handspring.
The Handspring is a major journey for all pole dancers to unlock. And we are going to break it down bit by bit in this detailed blog. There’s so much to cover in this incredible feat of strength & power, so it’s no wonder why for many polers this is the dream trick!
Just before I begin, I want to quickly define a few pole terms because these words are used too often interchangeably.
Handspring – The kicking up/tucking/lifting movement required to get into an Ayesha whether it be from the floor or aerial.
Ayesha/Static V – The end hold position of a handspring. This is the upside down leg straddle position and it can be entered into via a range of entries, not just a handspring
Deadlift – this is the name we give to the type of movement that’s performed with a number of tricks. A deadlift means that there was no jumping or active push into a trick. The movement all comes from the arms and the abs. This is why we often will call a move a deadlift straddle or a deadlift handspring etc.
Check out the video for further clarification if needed. Alright, good to go? Let’s begin to break down the handspring!
The 4 Stages of a Handspring
Wondering how the requirements of the upper body differ between our Handspring & Ayesha? Well before we explain that, let’s break down our handspring into 4 stages. The four stages of our handspring can be described as follows:
Stage 1 is the prep position
Stage 2 is the sticking point
Stage 3 is the knee tuck
Stage 4 is the Ayesha


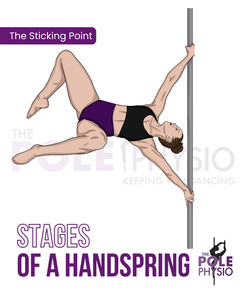


We'll frequently refer to each of these stages throughout the body, so make sure you become familiar with them now.
Let’s begin breaking down area specific anatomy now, starting with the…
The Upper Body
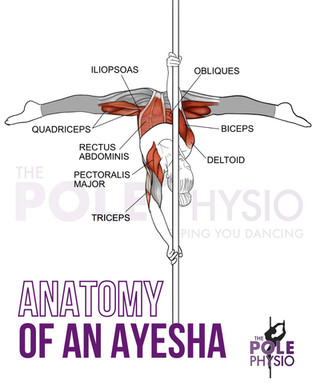
OK, so if you haven’t read the Anatomy of an Ayesha Series, then I would recommend you do so first before continuing – this blog can be found here. Understanding the in-depth requirements of an Ayesha first will place you in really good stead to understand the anatomy of a handspring as the muscle actions of the upper body are almost identical.
Here’s a quick recap of the what the upper body does in an Ayesha for those who have already read it. In an Ayesha, the upper limbs require:
180 degrees of shoulder flexion
Good shoulder ligamentous and muscular stability
Pulling through the top arm
Pushing through the bottom arm
180 degrees of elbow extension with muscular stability
Pronation or supination dependent on which grip you choose
Shoulder internal/external rotation range of motion dependent on which grip you choose
Good passive wrist extension and ulnar deviation mobility
Good grip strength
Good proprioception (body awareness)
Check out the awesome anatomy pics below for a great visual of the Ayesha!


So how does our Ayesha differ from our handspring? Let's break it down now!
Shoulder Mobility
Firstly it’s important to know that range of motion required from a shoulder is slightly different in a handspring compared to an Ayesha. In stage 1 & 2 of our handspring our body requires both shoulder flexion and abduction as our body lifts and rotates through range. In fact we require ~150 degrees of abduction, as well as our 180 degrees of flexion in the bottom arm. This is compared to the pure 180 degrees of shoulder flexion required in the Ayesha (stage 4). So without these two movements our Handspring won’t occur.


Shoulder Stability
We additionally require strong stability from our shoulder joint. Stability is the term we use to describe the shoulder correctly sitting in the socket, kept in place by our active and passive stability. Without active and passive stability our shoulder can translate forwards or backwards in the joint which can lead to major injury. Shoulder stability is covered in great detail during our Ayesha blog here.
The main difference with the shoulder stability required in a Handspring compared to Ayesha is that the Handspring is a dynamic movement. This means we require stability through range. Whereas an Ayesha is a static hold, which is a slightly easier movement to provide stability for.
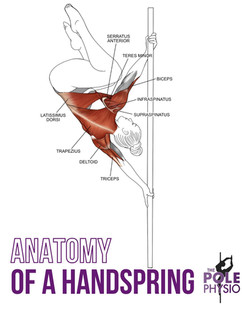
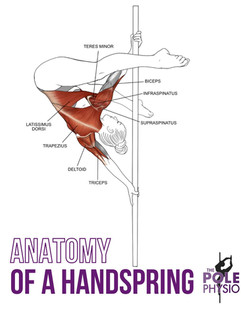
Our active shoulder stability is provided by the same muscles as an Ayesha. Our upper >lower trapezius, rhomboid, levator scapulae, and serratus anterior are busy elevating and stabilising the shoulder blade, whilst the rotator cuff (supraspinatus, infraspinatus, teres minor and subscapularis) are busy stabilising the actual shoulder in the socket.


Push vs Pull
Throughout the handspring movement, our upper body engages in the same way our muscles do when we Ayesha, i.e our stabilisers support the shoulder joints, our pulling muscles are used in the top arm and pushing muscles in the bottom arm. However, the one main difference is that our top arm muscles now additionally perform the movement of adduction to help pull our body off the ground. Our primary shoulder adductors are our latissimus dorsi.

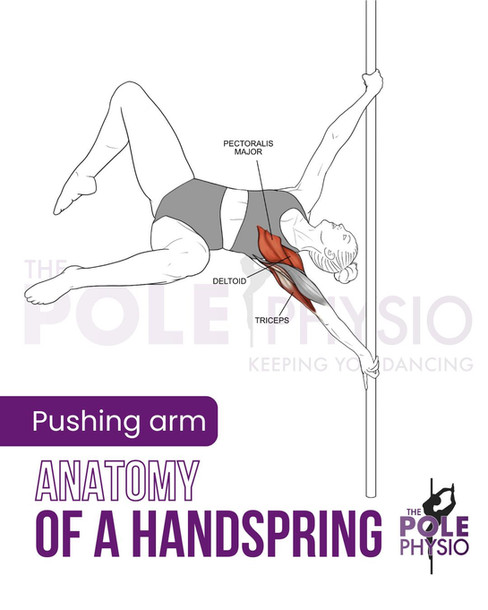


The Top Arm - What’s in a grip??
With each of the 3 main hand grips comes slight variations in movement of the top arm that’s important to know. There is a slight variation in the anatomy of each grip
Twisted Grip:
We've previously spoken in depth about the importance of engaging the shoulders correctly in a twisted grip position or else risking injury due to a reduction in shoulder space. For detailed information check out our blog on twisted grip here. But please note that we risk injury in any position, twisted or not, if we aren’t engaging correctly!
During our twisted grip:
Our top shoulder remains in full internal rotation throughout
The top arm starts at ~150 degrees abduction and slight horizontal extension. As we lift into our handspring the arm adducts, flexes and we end up in a more comfortable 80-90 degrees of shoulder flexion and internal rotation.
Our forearm remains in full pronation throughout
Our wrist is placed in a high degree of ulnar deviation

Straight/True Grip:

Our straight grip is very similar to our cup grip which requires 100 degrees of shoulder abduction to flexion at most throughout the dynamic movement.
This position also maintains shoulder external rotation and a bend through the top arm to engage the pulling muscles.
The main difference between true grip and cup grips lies in the top wrist which is placed in supination. This position does improve bicep activation and pull, but on the downside it increases wrist and forearm load which can lead to pain if not carefully controlled.

Cup Grip:

Cup grip is usually the handspring that’s associated with least amount of injury issues, however can be for many the hardest to achieve due to reduced bicep muscle length tension. In a cup grip:
Our top arm is positioned at 100 degrees of abduction to flexion throughout the movement. This is a reduction in the required overhead shoulder range compared to our twisted grip
Our top arm maintains a position of shoulder external rotation and elbow flexion which engages a better pulling action
We maintain active forearm pronation throughout the movement, however the wrist is considered to be in a neutral position which reduces the rotational shearing force through the wrist
This is by far the hardest of the three handspring grips to nail. Ensure you are training an active bicep pull of the top arm and firm knee/hip drive of the top leg to assist in nailing this move.

Torso – thoracic rotation
Generally speaking, a very small amount of upper back rotation occurs during a handspring. But this is an interesting point to cover as some people will use more rotation than others in their setup dependent on their starting position – i.e. head next to side or behind the pole vs top leg in front or behind the pole.
None of these starting positions are incorrect, but we prefer our patients to start with their head next to the pole and top leg in front of the pole. The reason why we prefer this is it is the most comfortable for our top shoulder and we don’t have to worry about hitting our head on the pole as we kick up! Check out some of the different ways you can enter a handspring in the video below!
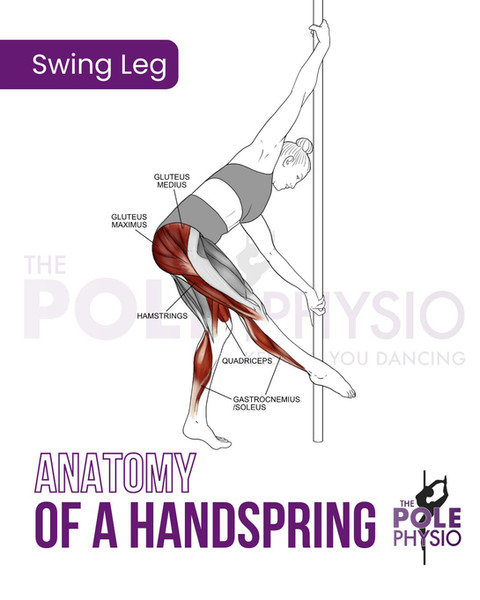
Legs legs legs
When learning a handspring from the floor the legs have an important job to perform, particularly in the early stages. Our swinging leg creates the momentum for our body to lift itself up, whilst the leg on the ground creates the power and push behind the lift.
Our swing is generated from our hamstrings, gluteus maximus and gluteus medius, whilst the push off the ground is generated from our gluteus maximum, gluteus medius, quadriceps, and gastrocnemius/soleus complex. The powerhouse glute muscles are primarily responsible for lifting both hips into the air and work in conjunction with the hip flexors to bring the knees to the chest.


Abs and Hip Flexors
Moving on to what is arguably the most important part of the handspring: the trunk. What I find fascinating is that during this trick, the abdominals are required to perform not 1, not 2, but 3 different muscle actions! These three movements are:
Anti-extension (flexion)
Lateral flexion
Anti-rotation
Let’s break them all down now!
Anti-extension – the sticking point!

The handspring is a bit of a journey to say the least. As we lift off the ground into stage 2, we encounter the sticking point of the handspring. The weight of our legs wants to pull our spine into back extension and the pelvis into anterior tilt in stage 2. Our body instead requires a strong active knee tuck via our rectus abdominus, obliques and hip flexor muscles to combat this weight and end up in the correct end position of posterior pelvic tilt and lumbar flexion.
Have I lost you already? No worries! Here’s a quick refresher on back movements:


Flexion, 2. Extension, 3. Lateral flexion
and now pelvis movements:


Posterior tilt, 2. Anterior tilt
So why is stage 2 called the sticking point? Well because if our body is unable to engage our hip flexors and abs correctly then there’s no way you’re getting up! You’re stuck! When you’re at this stage of the handspring, time feels like it stops. You’re grunting and pulling as hard as you can with your top arm, but no matter how hard you pull (or push with the bottom arm for that matter) there’s no getting up without the use of your abs and hip flexors.


Why is it so damn hard??? Well, during the lift our abdominals and hip flexors are placed on stretch in an eccentric position which makes it much harder for them to contract and bring our knees to our chest. Then we throw in a lovely thing called gravity which wants to exert a downward force on our abdominals through the weight of our legs. So no wonder why we find this a challenge! Once we are past this sticking point, our hips continue to lift up and gravity helps to bring our knees into our chest.
Trying out your handspring for the first time and struggling to get past this sticking point? Then try to drive your knees into your chest as quickly as possible to reduce your leverage. The longer the lever, the harder it will be for your body to overcome the degree of extension placed on your body.
Lateral flexion
Onto our next abdominal movement – lateral flexion. In the physio world we talk about opening and closing of joints of the spine. And lateral flexion is the

easiest movement to understand for this concept. When we start our handspring setup, we are positioned in lateral flexion (aka side bend), with the top side of the body being the open side, and the bottom side of the spine to closing. The lateral flexors of our body work the hardest in the first phase of the handspring. The side stretch of our body combined with the downward force of gravity makes it hard for these muscles to contract to get us off the ground.
To handspring, our spine moves into a position of flexion and lateral flexion on the opposite side of the body (i.e when inverted). So the side of the spine that is open to start with has to do the hardest amount of work to end up in a closed position. Unsure what I mean? Then check out the below pictures which demonstrate this movement.


So our body is required to move through almost full range of lateral flexion movement to end up in our Ayesha end position. This is why our obliques are
so important in our handspring.

Particularly our top external oblique, and contralateral lower internal oblique and adductors which act to create a sling across the body to contract and lift the hips up.
Did you know our groin muscles are one of our important core muscles??? Our groin muscles play an incredibly important role of increasing co-contraction across the pubic symphysis and providing lumbopelvic (back and pelvis) stability and power. Other important muscles that assist in lateral flexion are the quadratus lumborum, rhomboids, serratus anterior, gluteus medius and gluteus maximus.
Anti-rotation

And lastly, whilst our abs are already busy flexing and laterally flexing, our body is also isometrically resisting a rotational force. During a handspring our torso is facing up to the roof, but that little thing called gravity wants to rotate us down towards the ground. This is where all of the abdominals, specifically the obliques play a role in resisting this rotational force to keep us hanging. Pretty amazing isn’t it!? Floor Handspring Wrap Up
Once we piece together all of the above pieces of information we are left with the anatomy of a handspring in all of it’s gloriousness! And it looks a little like this:


And this!


So although it’s tempting with all your new found Handspring knowledge, if it’s one thing I ask you take away from this blog today, it’s to not overtrain this move. If you’re your ready for it (screening below) then try a few reps and move on to your next training move. Because when we become fatigued, and continue to train, risk of shoulder injury spikes. So please avoid flinging yourself into your handspring just because you so desperately want it. Trust me, we all do. But pushing yourself through non-ideal technique and/or fatigue for the sake of getting a trick will likely lead to a decent shoulder or lower back injury.
Handspring Screening
Before you attempt your handspring, it’s important stop for a second and figure out if your body is ready for it to support itself correctly under the demands of this trick. Which brings us onto how we can prevent handspring related injuries – my favourite part!
Many of the fitness testing methods out there are not specific to the demands of pole, so we’ve created this quick and easy list to tick off to see whether your body is ready to handle the demands of a (twisted grip) handspring. Please note there is no research behind this to prove its effectiveness in reducing injuries, just common sense and a solid understanding of Ayesha/Handspring demands.
We already known our suggested Ayesha requirements are:
Pole smarts and good foundational strength with our straddles and shoulder mounts
A confident straddle, outside leg hook to butterfly
A confident jamilla/apprentice to extended butterfly and pike
180 degrees of shoulder flexion
Overhead pushing strength
Horizontal pulling strength
Good shoulder stability
180 degrees of elbow extension (& implied stability)
Wrist extension & ulnar deviation
Grip strength
Abdominal anti-rotation and anti-lateral flexion strength
Sufficient hamstring and neural length
Good hip flexion and abdominal flexion strength
Good proprioception (body awareness) of where you are in space to stack the body correctly!
For our Handspring, we will also require:
The shoulders to be able to stabilise whilst placed under dynamic load through range of motion
45 degrees of thoracic rotation
Strong hip extensors to push the floor and drive the movement to our knee tuck
Great core strength through range of motion
So tick these off your list and you’re more than likely ready to start working on these tricks under the direct guidance and supervision of your instructor. Straight leg Handspring (from the floor)
Already got your handspring and want to level up? Of course you do! Then it’s time to work on your straight leg handspring. This movement requires the exact same as a bent leg handspring, it’s just a hell of a lot harder for your abdominals and hip flexors to control. Remember what we mentioned about levers before? A nice way to progress from bent legs to straight is to work on keeping the top leg straight and bending just the bottom leg as shown.

From this you could work towards both legs being straight. That’s some hard work!!

Aerial Handspring and Deadlifts
Ok, so you’ve conquered your handspring from the floor and wanting to try your aerial version? You are a pole dancing machine!!
So what’s the difference between the floor and aerial handspring other than one’s in the air? Quite simply - one is in the air/up the pole. We generate momentum by either kicking off the pole or casting to lift ourselves up.
What about a deadlift?
When it comes to deadlifts, we are eliminating momentum. Meaning our body is having to generate internal force to lift ourselves up. Soooo much harder. We are using pure arm, abdominal and hip flexor brute strength! 💪
When it comes to deadlifting, we can use a few different pathway options. Some are harder than the others. When first learning a deadlift, the easiest movement pathway is through the same pathway that your iron X would take. This keeps your body close to the pole and reduces the demands on the arms and abs. However if your goal is to perform a deadlift from a deadhang position with your body facing away from the pole, well get ready to work extra hard. This position demands more from the shoulders, spine, hip flexors and core. Why? The deadhang places our spine into extension, meaning our abdominals and hip flexors are placed on stretch, so it's harder to contract. So if a deadlift is your goal, start with the easier pathway option. And when you’ve nailed it, then start looking to the more challenging entry styles!
And this is why deadlifts are king. No momentum (swing) or push allowed, so our arms, abdominals/hip flexors have to work incredibly hard eccentrically to lift our body up!
The rest of the aerial anatomy otherwise remains the same. Check it out in greater detail below!


Well there you have it! All of the components of a handspring broken down for you to enjoy!
Have you been struggling to nail your Handspring but not sure why? Let us help you condition to nail this move! Or are you recovering with an injury and it’s getting in the way of your pole?
Online appointments can be booked with the Pole Physio via our ‘Book Online’ page that can be found here. Assessment and tailored rehabilitation are provided in accordance with best practice and evidence-based treatment to help you unleash your 'poletential'.
Until next time, train safe.
The Pole Physio
x
Please Note:
Any artwork on this or other pages of https://www.thepolephysio.com is copyrighted and is not be reproduced without written permission per the terms of use and conditions.
A handspring is a high advanced/elite level trick and a deadlift is an elite move. Conditioning for your handspring should ONLY be undertaken if your ayesha is strong and consistent and your instructor has deemed you ready to work on this trick. This information is general advice only and we are not liable for any injuries that may occur during training.
This page has been created to provide wonderful knowledge with the pole community and sharing of this page to pole friends and pole related facebook groups is actively encouraged.


Thank you for taking the time to publish this information very useful!<a href="https://renovofficial.com" title="Renov official">Renov official</a>
Nice post, thanks for share. Desi49 Skincare
After Obama says they're real, bg678 login Trump orders release of government files on UFOs.
Is there a contact page on your website rajaspin ? I want to send you an email, but I'm having problems finding it. You might be interested in hearing some ideas I have for your blog. In any case, it's a fantastic website, and I'm excited to watch it grow over time.
The structure on VBCASH88 helps the information come across clearly without feeling cluttered. I followed up by reviewing VBCASH88 to confirm the remaining parts of what I was analyzing.