Anatomy of a Brass Monkey Deadlift
- Simone Muscat

- Apr 2, 2022
- 8 min read
Updated: May 20, 2023
Are you ready to boss up your brass monkey? Hell yeh you are!
If you haven’t already, head to part 1 of our anatomy of a brass monkey blog that can be found here to learn the basic anatomy of the hold/grip position.
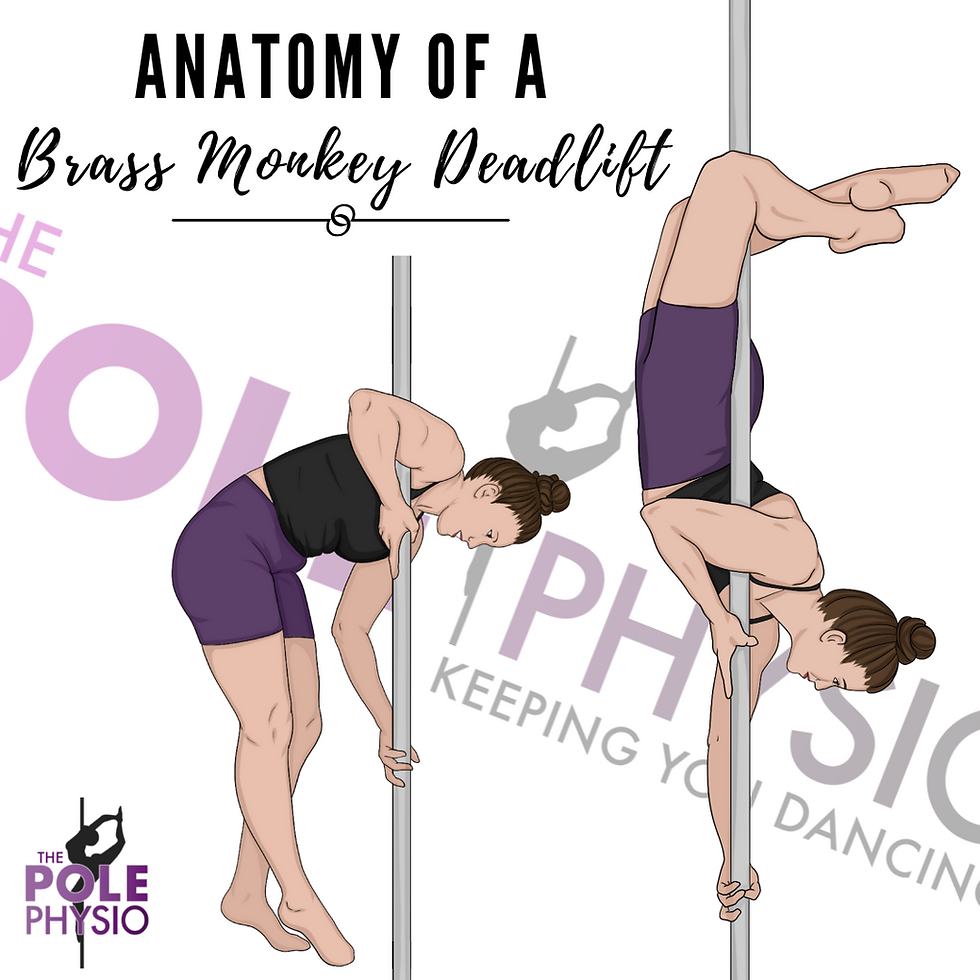
Let’s get brassy!
Before proceeding any further with our brass monkey deadlift, you’ll need a solid brass monkey hold and ninja like flag grip. Why? Well our flag grip is how we end up in our brass monkey position eventually so you want to make sure you’re strong in this position!
OK let’s do it! Time to break it all down…
The bottom (straightish) arm
Starting from our flag hold leg straddle, we require a considerable amount of pushing strength through the lower arm. This arm starts positioned into external rotation (palm rotated up) and into adduction (elbow close to the side).
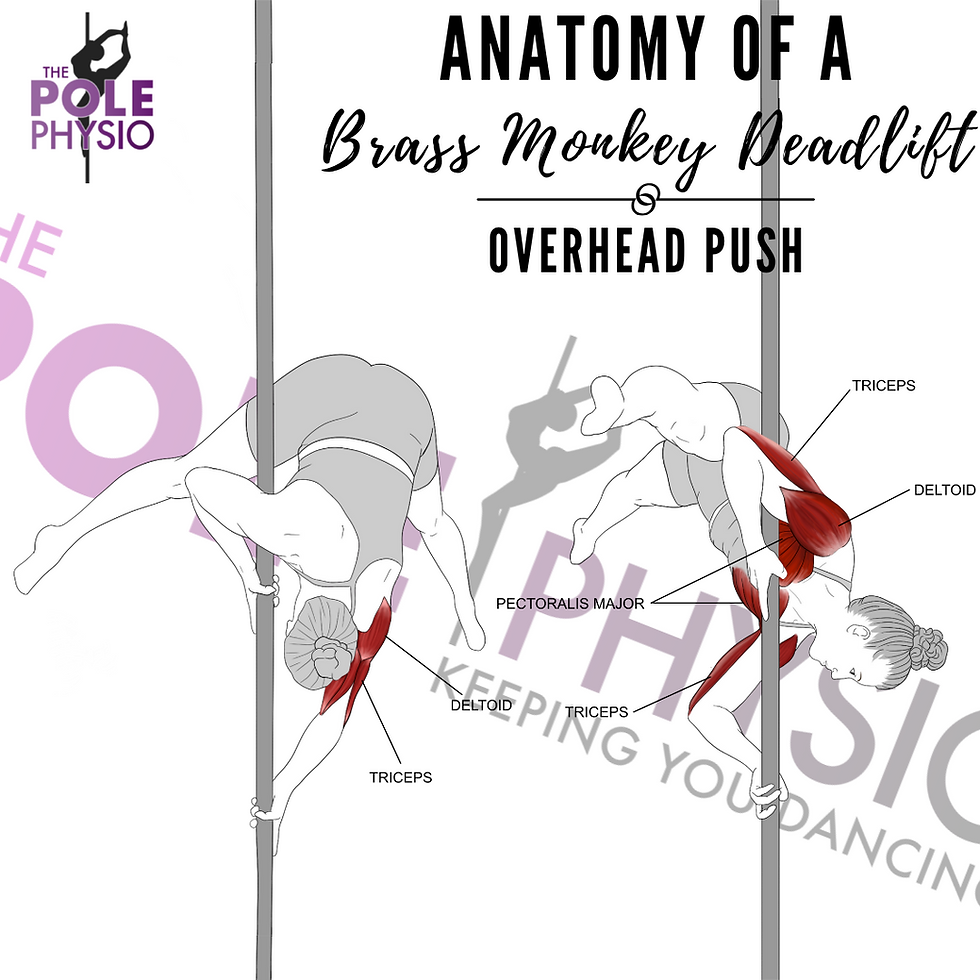
As we start to lift up into our deadlift, our bottom arm’s deltoids, pecs and biceps towards the top of the lift (yes biceps – you read that correctly!) push our body away from the pole into a position of shoulder flexion. All whilst this movement is happening, our rhomboids, traps, serratus anterior and rotator cuff muscles work to stabilise the shoulder throughout this dynamic movement!
Now that’s all just in one arm, what happens in the other?
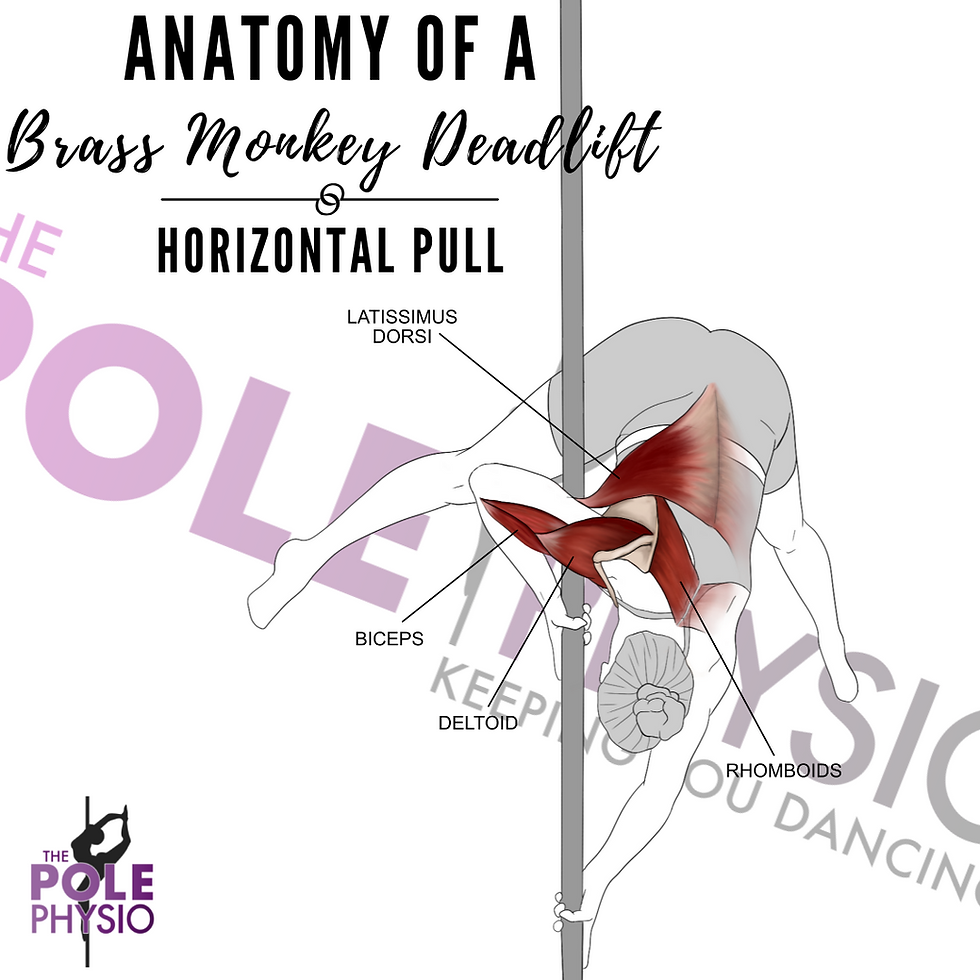
The top (bent) arm
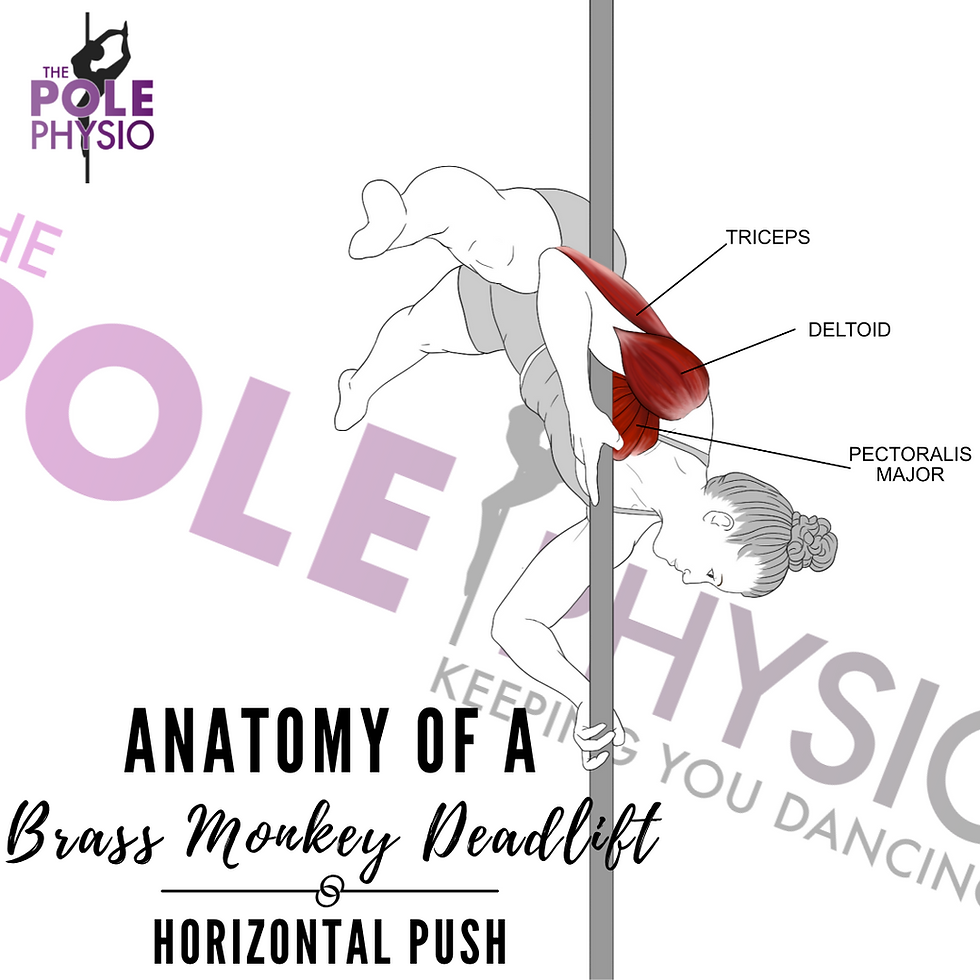
In the top arm, our elbow starts quite bent by our side with an active squeeze of the pole into our armpit. This arm is positioned in slight shoulder internal rotation in our starting position, with the lats and pecs working overtime to pull the body up the pole whilst also maintaining an isometric push.
This is the first time in all our anatomy blog series to date that our upper body uses not only our pushing muscles, but also our pulling muscles and stabilising muscles in the same arm at the same time! Mind blown right?! Yep!
Now let’s not forget that in both arms we also require very good grip strength which is assisted by the muscles of the forearms and the shoulders. We won't delve into this level of detail in today's series though; we will leave it for another day!
Ok, so we’re not even halfway through this breakdown yet but can you tell how excited we are?!
Moving on now to our trunk!
The core
It goes without saying that any deadlift requires a high amount of abdominal involvement, so the brass monkey deadlift is no exception. During this position our body goes from a position of spinal flexion (anti-extension), to a position of spinal extension (anti-flexion). And there is a key point in this movement where there needs to be a ‘changing of the guard’ from flexion into extension, otherwise we just won’t get up! All of these muscles work throughout this trick, but at this key point, there is a very definite switch in which muscles become the dominant ones working.

When initiating the deadlift, we want to utilise our rectus abdominus, transversus abdominus, iliopsoas and quads (hip flexors) to maintain a flexed trunk/hip position. This helps to keep our body compact which allows for an easier deadlift (smaller lever from the pole). If you don’t have a good forward fold/hamstring flexibility, then you can look at doing this movement with bent knees instead. And whilst piking or rotating the hips up the pole we may also use our quadratus lumborum and oblique muscles to assist (more on this shortly).
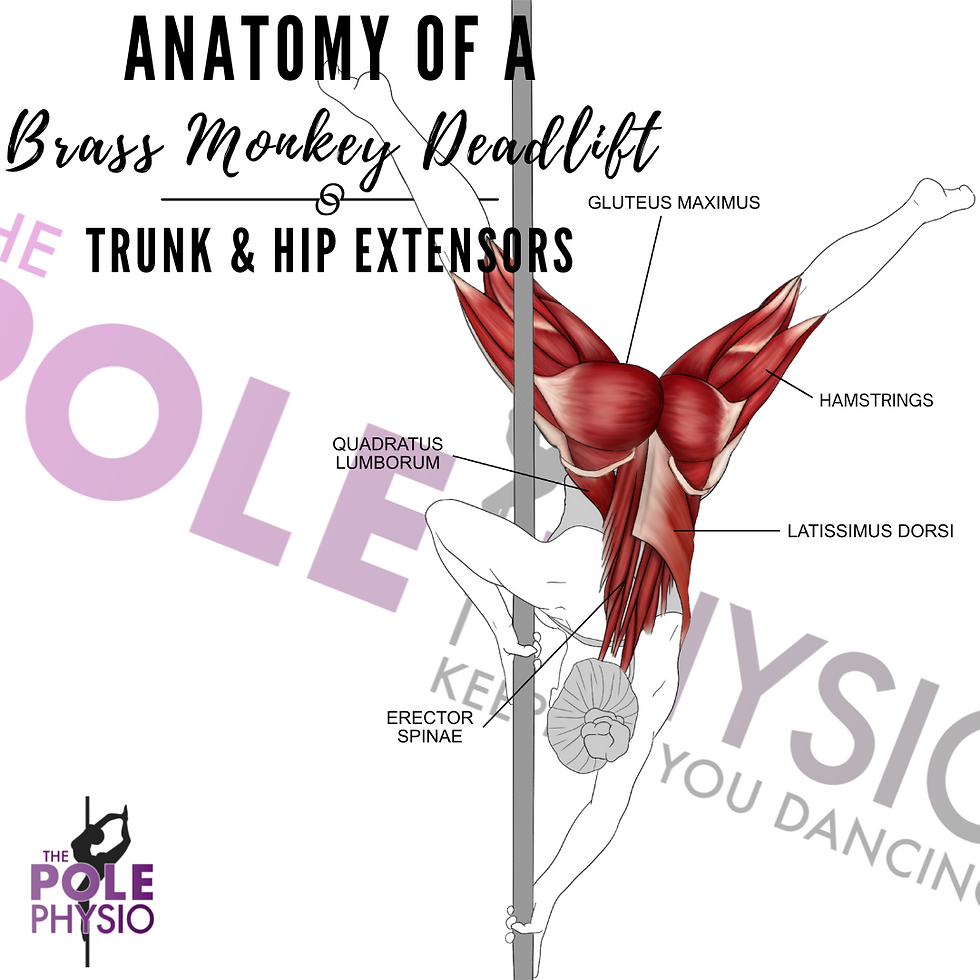
Ok, now that we are elevated with our hips overhead, the focus needs to shift from keeping our thighs close to our chest to lifting our legs up to the pole. I.e we are moving the pelvis and back from a flexed position to an extended position using our back extensors, gluteus maximus and hamstring muscles. So we are now performing a hip extension movement which is supported greatly by our core and upper body pushing/pulling muscles.
But which way do I lift?
Now there’s a few different ways to lift our legs into our brass monkey! And this does change the demands on our legs, but mostly it relates to what’s happening in our trunk! Aka our rotational & lateral flexion muscles.


The two key ways of lifting our body that we will talk about today are our swivel version that is done as a rotational movement in the transverse plane and the pike lift which is done in the true sagittal plane.
So there are a few pros and cons of each entry including different demands on the abdominal muscles and load on the shoulders, but there is no preferred way. You do whatever feels natural and good for your body!
Here’s the key differences that you should know about each of them:
Pike entry: Whilst there is very small amount of trunk rotation that occurs right at the end of this entry, majority of this movement is actually in a pike, hinge or forward fold position. This folded position does stretch out the posterior chain muscles and as a result this places greater demands on them to engage and lift the body up to the pole. They are required to engage from an eccentrically lengthened positioned to a concentric or shorted position for a leg hook which requires a lot of conscious thought and activation or the gluteal and hamstring muscles! This motion is very similar to what we would see in a gym reverse hyperextension.

Swivel entry: so the key difference here is all in the name. It’s a swivel! Instead of entering via a forward fold, we rotate the torso towards our top arm which results in a greater push of the body into shoulder abduction and flexion (instead of pure flexion). This rotation also starts preferencing our rectus abdominus, obliques and quadratus lumborum muscles to do a lot more of the work of the lift for us. As a result, this movement becomes a lot more focused on anti-lateral and anti-rotational core strength. Once our hips are lifted up high enough, we can the lift the leg to the pole to initiate the leg hook and extend our hips/back from a position of lumbar flexion to extension.

Is your brain swivelling? It’s ok if it is, it’s a lot to take in. And probably in what feels like a completely different language. Read back over it a few times if you need, otherwise take a deep breath and sip of your wine as we are almost there!
The legs
Arguably one of the most important parts of our brass monkey deadlift is our legs. Throughout our whole deadlift (until the hook) we require quad strength to maintain a straight leg position, which conversely means we require good hamstring flexibility to allow for a straddle. Whilst a full forward fold is not a necessity for this trick, feeling comfortable into at least a half range forward fold will be helpful. If you don’t have that range of motion, you might find your body prefers the swivel entry option into your brass monkey.
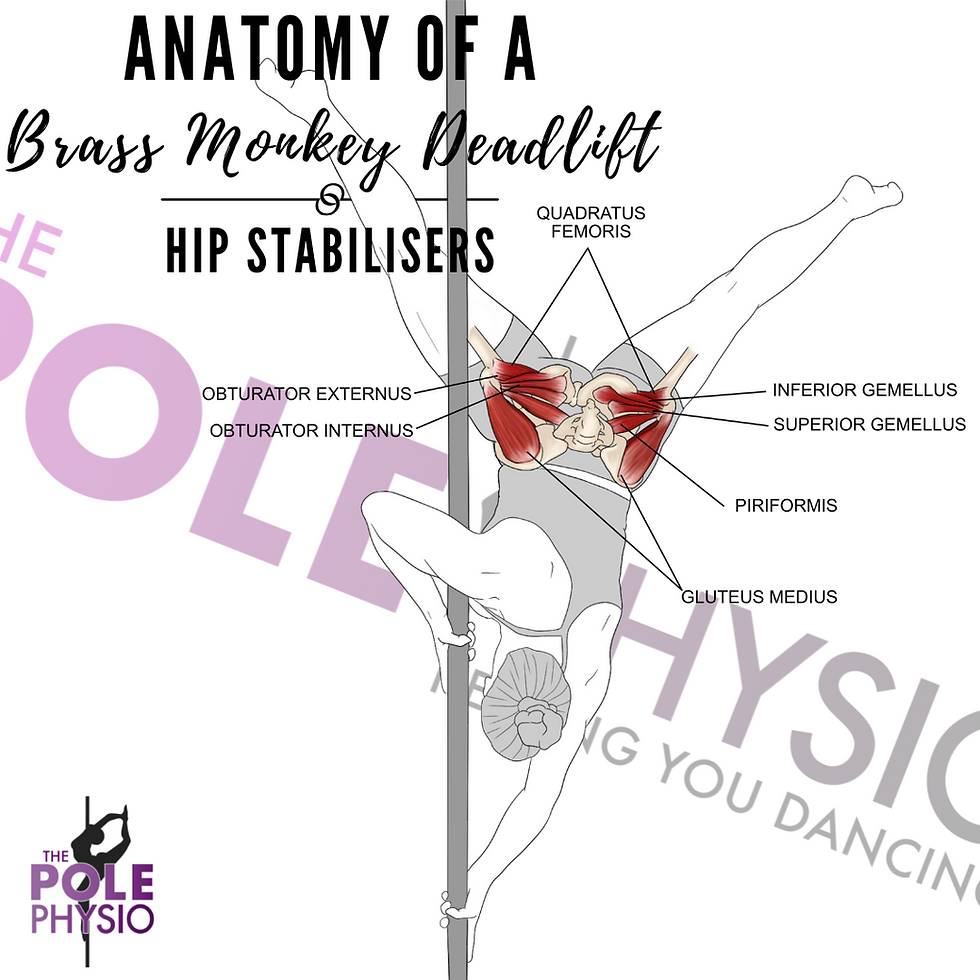
As mentioned under the core section, our quads/hip flexors also have the added role of assisting our abs in keeping a lumbar flexion position at the start, and our glutes/hamstrings are utilised to lift our legs up to the pole into a position of hip extension. Additionally, we often find our hip abductors and external rotators will work to lift the hips (particularly in the swivel option). I mean, why make two muscles do all the work when seven others can help right?
Once in our brass monkey hold, our glutes and hamstrings stay active to maintain our hip extension position and our legs remain slightly abducted and externally rotated to position into our brass monkey hold (if that’s what we desire). Otherwise, we can use this brilliant entry to transition into many of the other gorgeous brass monkey tricks and variations out there.
The stepping stone
Now it may seem like we did a pretty big jump from a brass monkey straight to a deadlift right? Yes! Before we learn our brass monkey deadlift, there is an interim version that can be done. This is our kick up/jump version.
Whilst this can a nice way to get into your brass monkey when you start, a lot of polers do use this as a cheat option. And not in a good way!
Using momentum to help can be a good thing, but once you’re up there make sure you’re actually using your muscles to stop the momentum and hook the leg onto the pole. The aim of the game is not to swing so high that you just automatically crash yourself into the pole! This is a big no no. Use momentum to get you most of the way there but make sure you’re teaching your muscles how to work so you can eventually progress to your deadlifts.

Requirements of our Brass Monkey Recap
Ok now that’s we’ve broken it all down, let’s do a quick recap of the key requirements of your deadlift brass monkey:

Shoulder and scapula stability/control
Vertical/overhead pushing strength of both arms
Horizontal pulling strength of the inside arm
Strong grip strength
Anti-extension and hip flexion strength (for the first half)
Anti-rotation and anti-lateral flexion core strength
Anti-flexion back extensor strength
Hamstring flexibility
Trunk and hip extension strength
Hip abduction and external rotation strength
Screening for the brass monkey deadlift
Already working on your deadlift brass monkey? Or ready to try after reading this blog? Well hold your horses for a second and let’s see if your body is ready to handle the demands of this move.
We can often replicate the requirements of pole tricks off the pole safely to determine if our body has capacity for a movement on the pole. This helps us not only nail the move, but also keeps us clear from injury. If you’re able to pass the below requirements and already have a strong kick up to a brass monkey then chat to your instructor to begin work on your deadlift.
Shoulder stability - Shoulder blade push ups on feet x 30
Overhead pushing strength - Single arm plank to single arm downdog x 10 each arm
Horizontal pushing strength- Toe push ups x 30
Pulling strength - Seated pole pullups 2 x 10
Anti-extension /hip flexor strength - Split/flag grip straight leg lifts x 10 each side
Anti-rotation strength - Plank shoulder taps 2 x 20
Anti-lateral flexion strength – Chair side plank x 1.5 minutes each side
Glute and hamstring strength - Pole headstand leg negatives 2 x 10
If you don’t tick these boxes yet, no worries. These now become your off the pole conditioning to help prepare you for the demands of your brass monkey. Why not just train your brass monkey you ask? You certainly can, but we don’t encourage it. Training a move poorly time and time again won’t actually build you that pole strength you need. Instead, it just builds learned movement patterns in your brain of what you don’t want to do. So train smarter not harder to get the moves you desire!
And there you have it, that’s a wrap! We hope you enjoyed nerding out on Brass Monkey anatomy as much as we did. Hold tight for our on and off the pole conditioning being released on socials shortly and don’t forget to subscribe to our mailing list to keep updated on newest blog releases.
Have you been struggling to nail your Deadlift Brass Monkey but not sure why? Or recovering with an injury and it’s getting in the way of your pole?
Online telehealth appointments can be booked with the Pole Physio via our ‘Book Online’ page that can be found here. Assessment and tailored rehabilitation are provided in accordance with best practice and evidence-based treatment to help you unleash your 'poletential'.
Until next time, train safe.
The Pole Physio
x
Please Note:
Any artwork on this or other pages of https://www.thepolephysio.com is copyrighted and is not be reproduced without written permission per the terms of use and conditions.
A Brass Monkey Deadlift should ONLY be undertaken if your instructor has deemed you ready to work on this trick. This information is general advice only and we are not liable for any injuries that may occur during training.
This page has been created to provide wonderful knowledge with the pole community and sharing of this page to pole friends and pole related facebook groups is actively encouraged.


This post answers several basic questions about Goa Game in a straightforward manner. It would be useful to keep the article updated whenever there are changes to the platform.
This gaming website offers a very smooth and enjoyable experience. The interface is clean, the navigation is easy to understand, and all sections are well organized. I appreciate how quickly the pages load, even on mobile devices. The platform feels reliable and user-friendly, making it suitable for both beginners and experienced users who want a hassle-free online gaming experience.
diu win login
This guide is very useful for students in Jharkhand who want to apply for scholarships. The section explaining the e kalyan Jharkhand system is simple and well explained, helping users complete their applications easily and without technical difficulties.
Yasdl کاربران را با نرمافزارهای تخصصی و حرفهای آشنا میکند.