Nerves - The Upper Limb Edition
- Danielle Davey

- Oct 29, 2022
- 9 min read
Updated: May 20, 2023
Welcome to part 2 in our series on nerves! This one is alllll about the upper body.
Before we jump in, make sure your background knowledge is up to date by reviewing our Nerve 101 blog from earlier this year.
Okay, straight to it people!
Why do I care about my upper body nerves in the first place??
If the nerves in your upper body aren’t having a good time, you may notice symptoms like:
Strange sensations- pins and needles, numbness or tingling. This is especially common in the hands. It might happen in extreme ranges of motion, or if we hold a stretch or move for a long time.
Restricted movement that doesn’t seem to improve when you stretch. This might be overhead, out to the side (reaching back for superman), or behind the back, for example.
Loss of strength, such as grip. Usually this is one or two muscle groups only and just won’t seem quite right. It might come on suddenly and be position dependent- different from just fatiguing during training.
When the nerves in the upper body are functioning well, they:
Allow us full range of motion, to be able to stretch our muscles and move further.
Tell us information about where our arms are, how our muscle engagement is and how our grip on the pole feels.
Tell our muscles when to work, in what order and how strongly.
Act as our danger signal, sending pain messages when something doesn’t seem right.
Let’s have a look at our amazing nerves in detail.
Upper body nerves
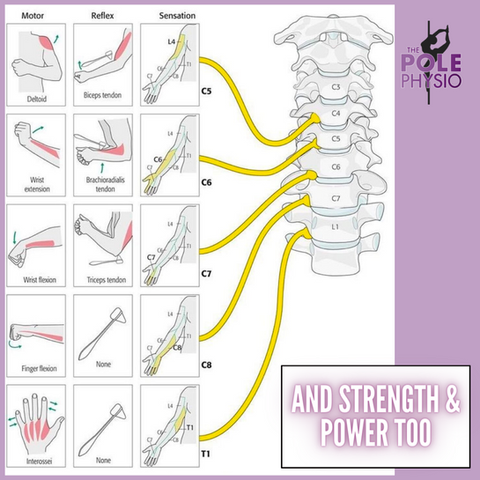
In our blog Nerve 101, we talked about how our nerves start off in the brain and spinal cord (Central Nervous System, CNS). Beyond the brain and spinal cord, the rest of the nerves are part of the PNS (Peripheral Nervous System). In today’s blog we are looking at the PNS of the neck, arms and torso, and these come from the spinal nerve root exits C1-T12. This is all 8 of the cervical nerve roots (nerves exiting the spine in the neck) and the 12 thoracic nerve roots (upper back).
Here is a little review of where they are and what they do:


Peripheral nerve bundles

Once our nerves travel further away from the spine, they weave together to join other nerves, then divide off again in different patterns, a bit like a 3D macrame wall hanging! Between the spine and upper arm, this organised mess of nerves is called the Brachial Plexus. It contains all the nerves that travel down the arm.
Past the shoulder, the Brachial Plexus divides off into smaller bundles of nerves. There are names for many different bundles, but here are the 3 most commonly talked about are the radial, median & ulnar nerves.
Nerve Function and Pole Dance
As we talked about in Nerve 101, nerves don’t stretch. Like the cord on a vacuum cleaner, they can become caught on structures they are passing by, limiting their ability to slide and glide through our body.
If they get a little bit stuck, we can find our mobility limited. If they become compressed, we start to get more unpleasant symptoms like weakness, altered sensation, and numbness.
How can we test if a nerve is lacking mobility?
It can be tricky to do yourself, but here are some simple self-tests try. Let’s look at each individual nerve.
In each of the following tests, we lengthen out one of the major peripheral nerves. Once we feel some pulling, restriction in movement or other sensation, we stop. We then use head movements to increase and reduce tension on the nerve to check if that is the cause of the symptoms. If neck movement changes the symptoms in the limb, we have a positive test. This is known as sensitising. A positive test means that nerve mobility is probably affected.
Radial Nerve
The radial nerve innervates (goes to and from) the thumb, plus the back of the hand on the same side. If your radial nerve (or its nerve roots) lacks mobility, you may have trouble with moves where the arm is behind your back, like:
- Reverse baseball grip
- Reverse elbow moves such as satellite
- Side line
- Planche variations
Test:
a. Arm movement: Cross the thumb across your palm and curl the fingers into a fist around it. Flex the wrist, keeping the fingers in tight. Straighten the elbow, turn the arm in and then extend the arm out behind you. Stop at the first point that you feel pulling or changes in sensation and move on to step 2.
This is a quick variation of what would be done in the physiotherapy clinic. For those of you who love to know all the specific details, the main anatomical movements that bias the radial nerve are:
Thumb, index finger and wrist flexion
Forearm pronation and elbow extension
Shoulder internal rotation and extension
Scapular depression
b. Tilt the head away from the arm you are testing. Does this increase the symptoms? This may be a positive test.
c. Tilt the head toward the side you are testing. Does this reduce the symptoms or allow you to move your arm further in to the test? This confirms you have a positive test, i.e. that your radial nerve mobility is reduced.
2. Median Nerve
The median nerve supplies most of the palm, plus the front of the index and middle fingers and thumb. If this nerve or its roots are struggling, you might have trouble with:
Reaching out behind you for moves like superman, broken doll, or closed allegra
Your hand going numb when your wrist is either very flexed or extended, eg in a plank or handstand.
Grip strength, especially reaching behind you or with arm overhead
Bridges
Test:
*Again, if you get any symptoms or restriction, stop and move to the neck part of the test
a. Arm movement: start with the arm directly to the side of you with the elbow bent (wrist near the shoulder). Extend the wrist and the fingers, palm facing up (like carrying a platter of food). Slowly extend the elbow, straightening the arm out to the side toward horizontal.
For those who want to know the anatomical motions that bias the median nerve:
Scapular depression
Shoulder horizontal abduction and external rotation
Forearm supination
Wrist and finger extension.
b. Add in a head tilt away from the arm you’re testing. Does this increase your symptoms?
c. Add a head tilt toward the arm you’re testing. Does this relieve the symptoms or allow you more range of motion? This is a positive test.
3. Ulnar Nerve
The ulnar nerve innervates the little finger, part of the 4th finger and the same side of the hand. Pole moves involve combinations of internal shoulder rotation and overhead motion might cause difficulty if your ulnar nerve isn’t moving well:
Twisted grip moves overhead:
TG shoulder mount
TG split grip spins, such as air walks
Ballerina
Vortex
Bird of paradise
Batman, vomitron and other overhead bracket type grips
Test: *Again, if you get any symptoms or restriction, stop and move to the neck part of the test.
a. Arm movement. Stop as soon as you feel any pulling or changes in sensation and move to step 2.
Make an “ok” sign and turn it upside down by turning the fingers back toward you. Keep the elbow directly out to the side from you and don’t let the shoulder blade lift. Try to take the hand and place it on your face like one half of a pair of glasses.
The anatomical movements that bias the ulnar nerve are:
Scapular depression
Shoulder abduction and external rotation
Elbow flexion
Forearm pronation
Extension of the wrist and the little and ring fingers
b. Check whether tilting your head away or toward the test side sensitises or relieves symptoms, respectively. If so, this is likely a positive test for restriction of the ulnar nerve.
Keep in mind there are more peripheral nerves than just these and any nerve issue can be very individual. You may not fit exactly in to one of these categories. If you have any queries, you can make an appointment online with our Pole Physios <link> or touch base with your local health care provider.
What causes restrictions in nerve mobility and nerve compressions?

As the nerves move through the body, they pass by a lot of STUFF! Any structure in the musculoskeletal system could technically create an ‘anchor’ to irritate our nerves or restrict their motion.
Spinal discs
Muscles (especially where nerves run through, between or under them)
Connective tissue
Joints
And where are these anchor points likely to be?
At a location of past injury or strain
Close to a joint
But most of the time our restrictions in our nervous system aren’t pathological, meaning there’s no direct compression or ‘anchor’. Our nervous system can become sensitised if our body is feeling stressed, exhausted, overtraining, unwell or just isn’t feeling generally nourished - i.e not getting enough sleep or recovering from a recent illness. The nervous system becomes generally sensitive in these situations and our nerves become naturally restricted.
What can I do to help my nerves out?
So, you’ve tested your nerve mobility and worked out that it is indeed restricted. Next, you’ve considered where that poor nerve restriction may be.
We will be working practical ways you can improve your nerve mobility in our socials this week, so check them out for some safe and effective exercises you can try to get you started. For now, here is a framework to use as a guide:
Example: My name is Dani, and I am working on my crescent moon on the pole. I warm up and stretch my shoulders in a bridge to prepare myself, but I don’t have as much overhead movement in the right arm as the left. I feel a pull down the inside of the arm and sometimes some numbness in my hand when I try to push through.

All the classic signs of a nerve problem! Let’s work through the steps to help me out:
1: Nerve mobility tests- radial, median and ulnar (as above and in this week’s socials).
Eg: the median nerve test was positive, with symptoms and reduced movement. I take a photo of how far I could move in that and my bridge, so I have a baseline measure.
2: Work out where my restriction could be - polers know a lot about their bodies, so we can have an educated guess. Restriction (or anchor points) can be anywhere along the nerve line- from the base of the skull to the tip of the finger, but most likely around a joint or injury site.
Eg: Both my neck and my right shoulder are a bit stiff.
3: Try mobilise our muscles/joints - Choose one area or release to work on, then reassess. This way, if we see improvement, we’ve learned something.
Eg: I try some neck mobility work. I retest and there isn’t a lot of change. I try releasing my pec with a ball. My shoulder position improves and my retests both improve as well. This supports the idea that my restriction (or anchor) point was most likely at the shoulder. Keep in mind there can be more than one!
4: Nerve glides- We use nerve mobilisers, also called glides or sliders, to directly mobilise and de-sensitise the nerve. This is NOT nerve stretching; it is more like flossing your teeth. These should be completely symptom free (no pain, pulling or anything else). If it isn’t, stop, as this can irritate the nerve and cause latent pain. Check our socials this week for how to!
5: Stop the problem coming back- Arguably the most important step is to work out why the problem was there to start with! Common causes include:
Stiffness from repetitive movement patterns (eg lots of texting looking down without taking a break to move around in other ways)
Poor deep stabiliser muscle strength/control
Stress
Pole technique problems (like hanging from your top arm in spins, rounding the shoulders when inverting, or jutting the chin forward in a shoulder mount)
Eg: I have spent a lot of time on the computer this week, writing blogs! 😉 I have been using my shoulder a lot in a rounded position and haven’t done much external rotation or other movement to counter that. Next time, I will take frequent breaks and move in different directions to stop this happening.
A note on nerve stretches/tensioners
Before we head off to test out our nervous systems, a little note about nerve tensioners. A tensioner is where we extend a nerve out to its full range, placing it on a gentle stretch, as opposed to “flossing” it back and forward like we do in a slider. Some people will be familiar with this idea or may have been given these as rehab exercises.
I want to make sure this is something our lovely readers are all aware of and let you know why I haven’t suggested them in this blog. Tensioners can be really useful when used for the right person at the right time, but they also have the potential to cause flare ups when used incorrectly.

There are generally other things (mobilising anchors/points of restriction, practicing sliders and general nervous system wind down) that I usually find better results doing first. We don’t want you at home jumping straight to tensioners without guidance on correct form and dosage, resulting in latent pain or increased symptoms. For this reason, we prefer tensioners to be used when specifically prescribed for you by a health care professional and have left them out of this blog series.
Remember when it comes to nerves, it’s all about working with our bodies to de-sensitise them and down-regulate our fight and flight system. The more relaxed our body feels, the more mobile our body will be in our tricks.
Are you working on a pole trick and not making improvements in your flexibility? Book an appointment with a member of the Pole Physio team here to determine the root cause and to have a mobility program tailored to you.
Online telehealth appointments can be booked with the Pole Physio via our ‘Book Online’ page that can be found here. Assessment and tailored rehabilitation are provided in accordance with best practice and evidence-based treatment to help you unleash your 'poletential'.
Until next time, train safe.
The Pole Physio
x


“Really liked your post! I’ve been trying to decide on a dining table for months, and your tips about wood type and finish are super helpful. I recently saw some solid wood pieces from WoodEnsure and their craftsmanship seems to match what you describe here — sturdy joints, natural texture. Thanks for writing this, it gives me more confidence to invest in quality furniture.”
Wakad Wagholi Viman Nagar Vishrantwadi Shivajinagar SB Road Ravet Pune best city Pimple Saudagar Pirangut Marunji Nigdi Pashan Pimpri Chinchwad Magarpatta Lohegaon Koregaon Park Kalyani Nagar Kharadi Pune city Service Pune Star Hotel Hinjewadi Pune desire Pune Airport city Akurdi Aundh Balewadi Baner Bavdhan Bhumkar Chowk Pune city Chakan Dehu Road Deccan Gymkhana Dhanori best city
Your blog is always inspiring! If you want to solve Connections faster, the connections helper tool is always available for hints and solutions.
This is a fantastic deep dive into the importance of upper body nerves and how they impact movement and sensation. Those subtle signs like tingling or weakness can easily be overlooked but are crucial for early detection of nerve issues.
For anyone experiencing nerve-related discomfort, non-invasive nerve block in Markham offers targeted treatments that can relieve pain and improve nerve function without surgery. UnikaMed’s advanced therapies focus on restoring mobility and reducing nerve irritation.
Thanks for shedding light on this complex but essential topic — understanding our nerves helps us stay proactive about our health!
XY miner XY miner
cesur mining cesur mining
block chain cloud mining…
block chain cloud mining…
block chain cloud mining…
xy miners xy miners
rich miner rich miner
savvy mining savvy mining
xy miners xy miners
savvy mining savvy mining
savvy mining savvy mining