Anatomy of a Jamilla
- Simone Muscat

- Dec 24, 2022
- 8 min read
Updated: Feb 15
Updated 9th Feb, 2026
Welcome to our latest anatomy blog on the Jamilla! Created in the clubs and popularised by one of the OG’s of the industry (@jamilla on IG), this move is not only a pretty move by itself, but also a key transitional and foundational move that you’ll find being used again and again at an elite level.
For reference - You may also hear of this move referred to as the apprentice, although we much prefer to refer to it as a Jamilla to ensure pole history keeps being passed down for many years to come!
Let’s check out this move in action now
Let’s talk through the basic pole knowledge of this move before breaking it down into ooey gooey anatomy goodness!
The Jamilla is a progression of a cradle tuck also known as a knee tuck. In a cradle we place our arms on the pole in a split grip position, with our outside arm elevated and inside arm down. From here we lift our body, aiming to rest the pole on our inside hip crease and have our body facing into the pole (i.e perpendicular to the floor). A lean back and opening of the torso to the roof, a slide of the bottom arm, an opening of the top knee and extension of the legs brings us into our Jamilla position.
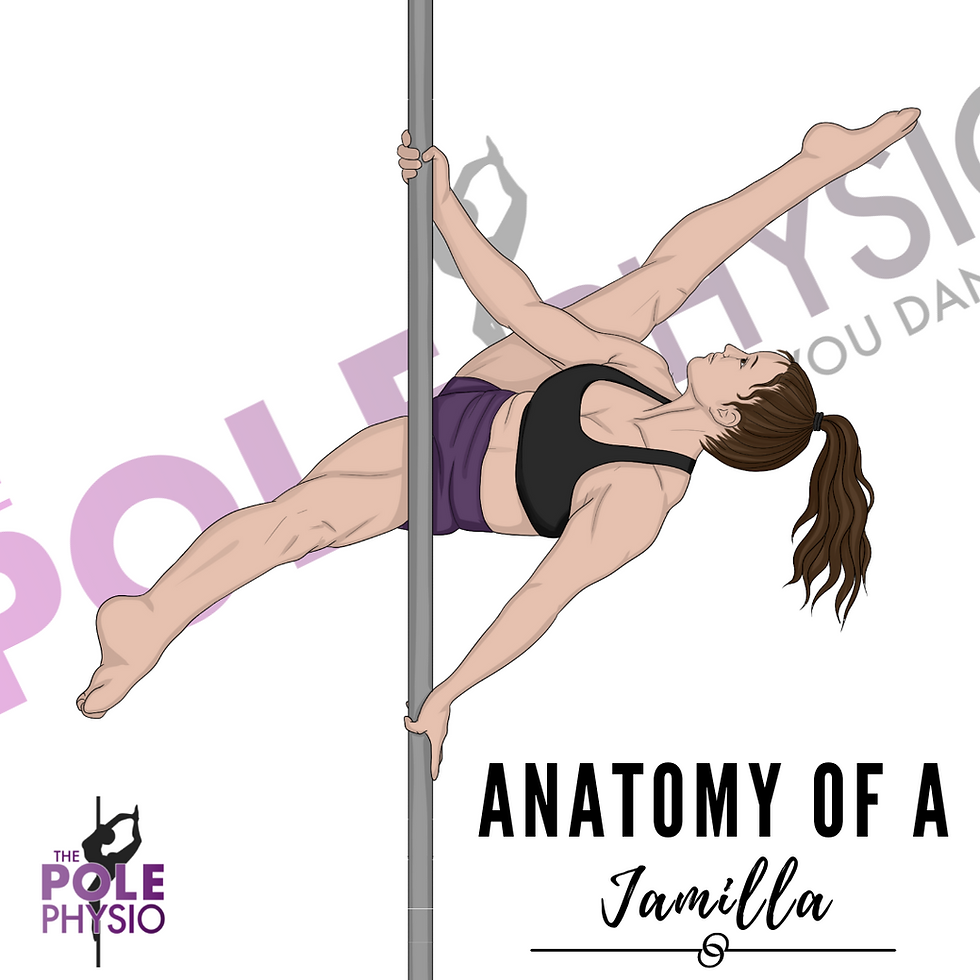
Key tips to know:
Start with your top arm at face height and bottom arm side by your side
Bend your top elbow to pull your weight up!
Lift the hips high into the space between both hands. Don’t let your hip sit on your bottom hand!
Let the bottom arm slide down the pole as the top arm straightens.
Lean back as you slide/straighten your arms
This will help you to maintain your position with minimal effort.
Key requirements for our Jamilla:
The ability to sustain a split grip position
A strong overhead pull of the top arm
A strong downward push of the bottom arm
Abdominal flexion, anti-rotation and hip flexion
Hip abduction and external rotation mobility and strength
Hamstring and adductor flexibility
The split grip
For many the Jamilla is the first introduction into our split grip position. One of the more demanding grips used at a high beginner/low intermediate level, this grip is known to be a bit of a problem child, causing issues for those who aren’t quite ready for it yet.
So, what makes a Jamilla so challenging?
Quite simply, it’s the angle of push of the bottom arm onto the pole combined with a lack of strength at a beginner level. When starting pole dance, we don’t magically build pulling and pushing strength overnight. If our top arm isn’t pulling its fair share of weight then, you guessed it, our bottom arm is given extra load that it has to push. This places the forearm and wrist muscles in an eccentrically loaded position which has been known to cause discomfort during a move or when we release the grip.
The fix? We can look at our mechanics and technique in this move to assist, and tailored strengthening is keyyyy! If you’re suffering with pain in your split grip, see our online physios are here to help. They’ll have you nailing your Jamilla pain free in no time!
In the meantime, try these handy technique changes:
1. Lower your bottom hand on the pole
2. Point the 2nd finger of the bottom hand down the pole
3. Focus on a strong pull through the top arm
4. Engage your shoulder external rotators (aka the rotator cuff! - not sure how? Our therapists can help!)
5. Aim to lift your hips higher – don’t let your hips sit on your bottom hand
Instructors – if your students have pain with this move, don’t encourage them to persist. Instead teach them a two-handed baseball grip tuck and work on their conditioning first to build baseline strength. And if lack of strength isn't the issue, get them into our team ASAP!
Let’s break down the individual demands of each arm now separately.
The Pulling Arm
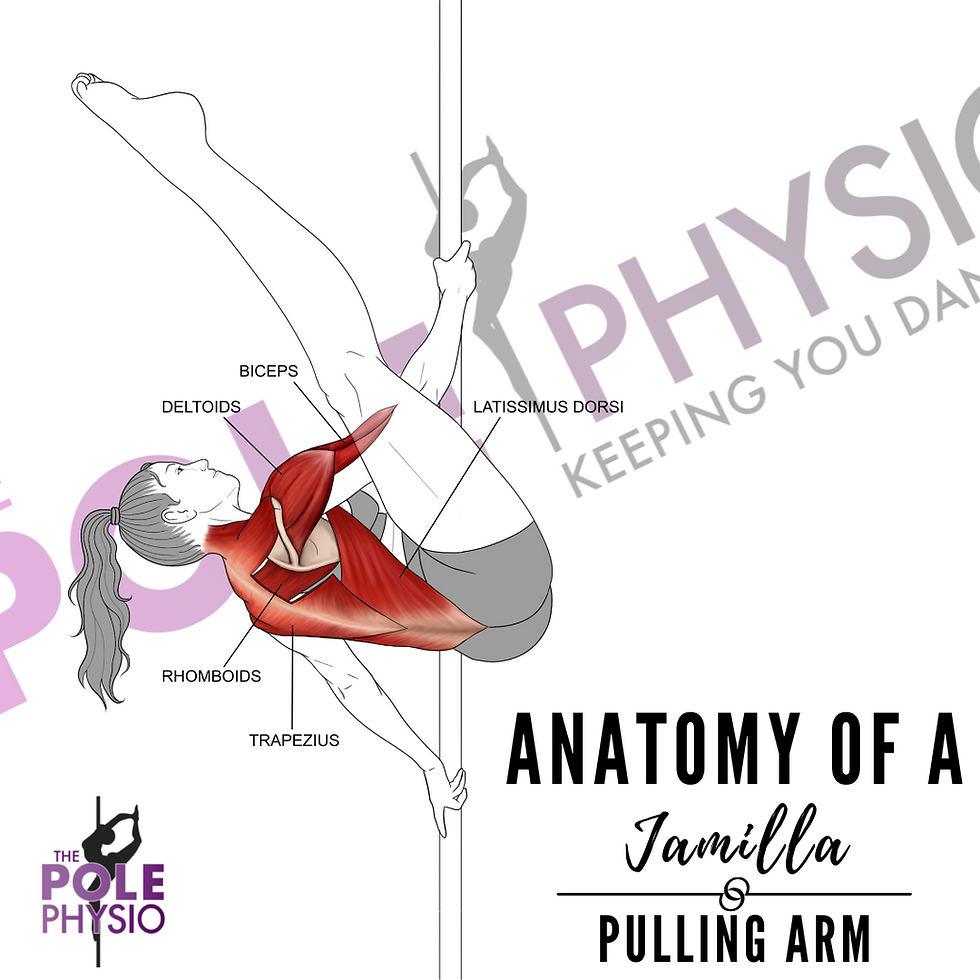
When lifting up to our cradle or knee tuck position, our top arm has a very important job of pulling our body vertically up the pole and horizontally to the pole at the same time. It’s a combined movement. This movement is predominantly due to the action of our latissimus dorsi, middle & posterior deltoid, rhomboids, trapezius and bicep muscles – our prime pulling and scapula stabilisation muscles. This movement is also assisted with our external rotators (rotator cuff) of the shoulder that co-activate to control the shoulder and assist with pulling force generation, and of course our smaller forearm and hand gripping muscles.
Once feeling strong in our tuck, we can lean back into our Jamilla. To do this, the elbow of our top arm straightens through an eccentric contraction (lengthening) of our bicep and our rhomboids and trapezius work quite hard isometrically to resist a protraction of the scapula (forward collapse of the shoulder). As our top arm straightens and we are lean back, it’s helpful to always think about maintaining a strong pull through this arm. We suggest cueing this by thinking about ‘bringing the pole to you' and by keeping some degree of slight bend through the top elbow.
The Pushing Arm
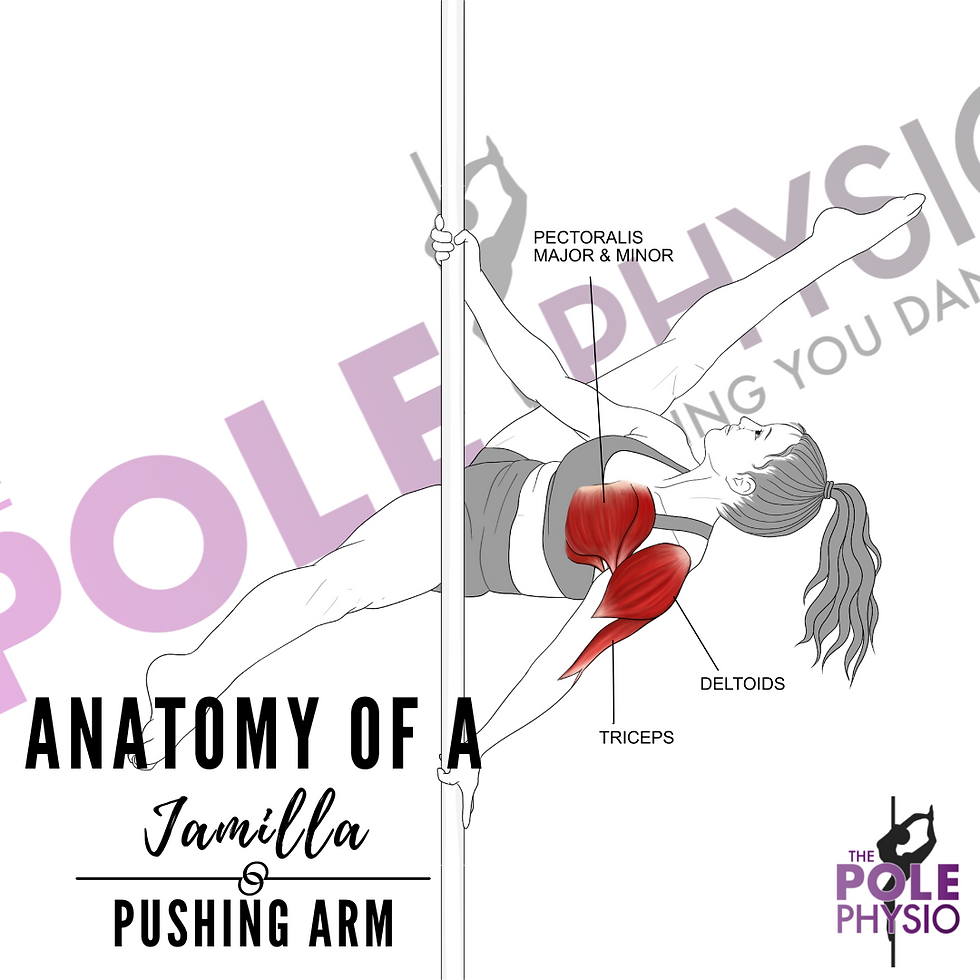
Taking it down the pole now to bottom arm, this arm works to assist your pulling arm. When entering into our cradle/tuck position, our bottom arm is required to produce force in a downward motion. This downward push works synergistically with our pulling arm to lift our body vertically up the pole. Mastering the bottom arm is certainly one of the more challenging aspects of nailing a tuck and/or Jamilla when first learning. As we are lifting our body up the pole, our bottom arm is required to slide down the pole at the same time.
When starting out we might find this bottom arm doesn’t want to budge and it can be quite uncomfortable on the forearm/wrist. This is often the case when we don’t have enough strength through our pulling arm. Remember – good strength through our pulling arm will take pressure off our pushing arm, freeing it up for that arm slide and torso lean back.

So let’s talk specific anatomy. When bringing our body into our tuck position, our shoulder starts in a position of extension and depending on the amount of trunk rotation, we will end in horizontal extension/abduction (chest facing towards the pole) or just pure extension (chest facing roof). This push is primarily driven by our triceps, deltoids and pectoral muscles. Of particular note here is our scapula. In this move our scapula is actually sitting downward rotation, anterior tilt and retraction – an interesting combination not often seen in pole dancers. This position is controlled by our scapular protractors (serratus anterior & pectoralis minor) and upward rotators (serratus anterior, upper trapezius & lower trapezius).
Abs and hip flexors

The act of tucking our knees into our chest when lifting off the floor places our spine and hips into flexion and pelvis into posterior tilt, with this movement primarily controlled by our rectus abdominus, iliopsoas and the quadricep muscles. It’s important than when performing our tuck and/or Jamilla that we drive the bottom leg to our chest, utilising the grip of our lower hip to hold us in place and to take the weight off our arms. Our quadriceps also have the important role of keeping our legs straight when extending out into a Jamilla.
Anti-rotation
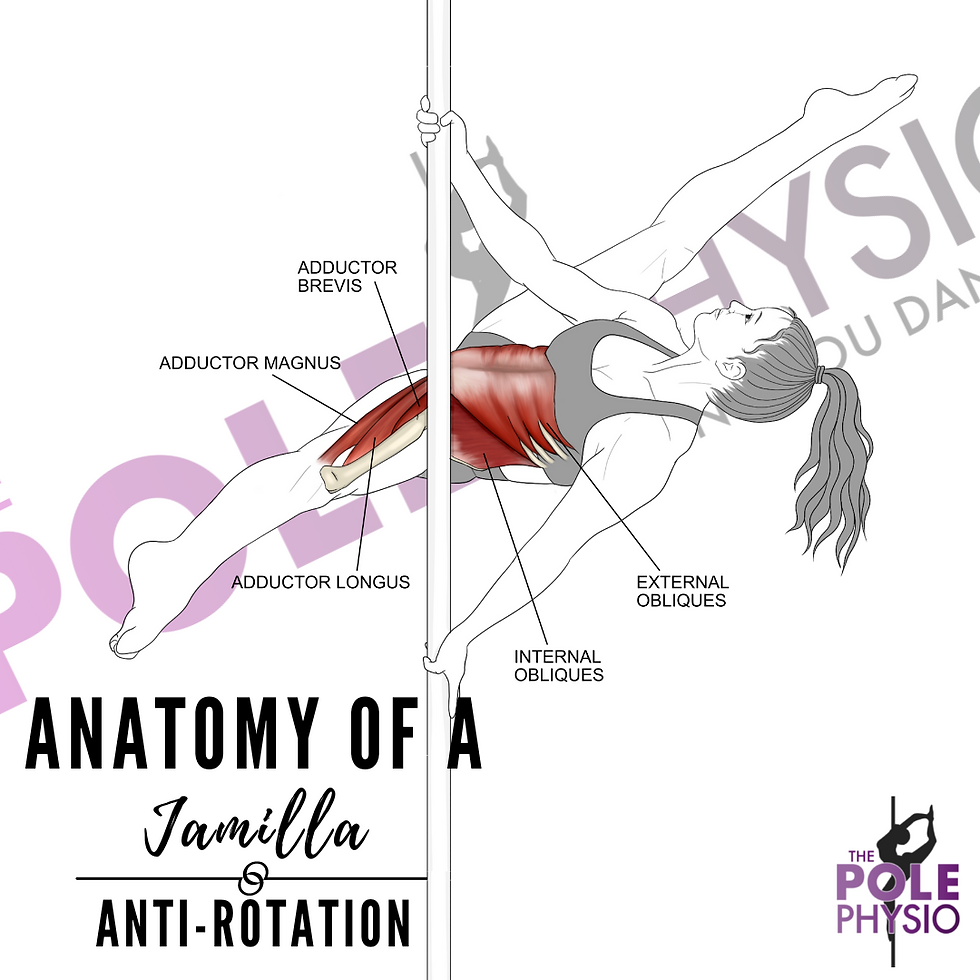
Our abdominals play an additional role in our Jamilla - that is resisting the force of gravity through anti-rotation. Our legs when extended make for fairly long levers that gravity pulls down on and it’s the job of our abdominal muscles to resist this force to keep us upright. This movement is primarily assisted by the obliques, with secondary assistance for the quadratus lumborum (QL) and adductor muscles. Big shoutout to our internal oblique on the side of the outside/top leg and external obliques of our inside (lower) leg that are working extra hard to keep us in position.
Hip abduction and external rotation

Our Jamilla is effectively a leg straddle position, that requires both hip abduction and external rotation mobility and strength. You will notice in our straddle our feet are turned out, and this is not by coincidence! Our external rotators and abductors of the hip are working hard to provide active control to this position. When utilised correctly, these muscles help to counterbalance the forces of gravity and maintain our Jamilla position.
The key muscles utilised here are our gluteus maximus, medius, minimus and tensor fascia latae. Secondary muscles include piriformis, obturator internus/externus and the gemelli. Remember: the stronger these muscles, the more epic the lines!
Hamstring and adductor flexibility
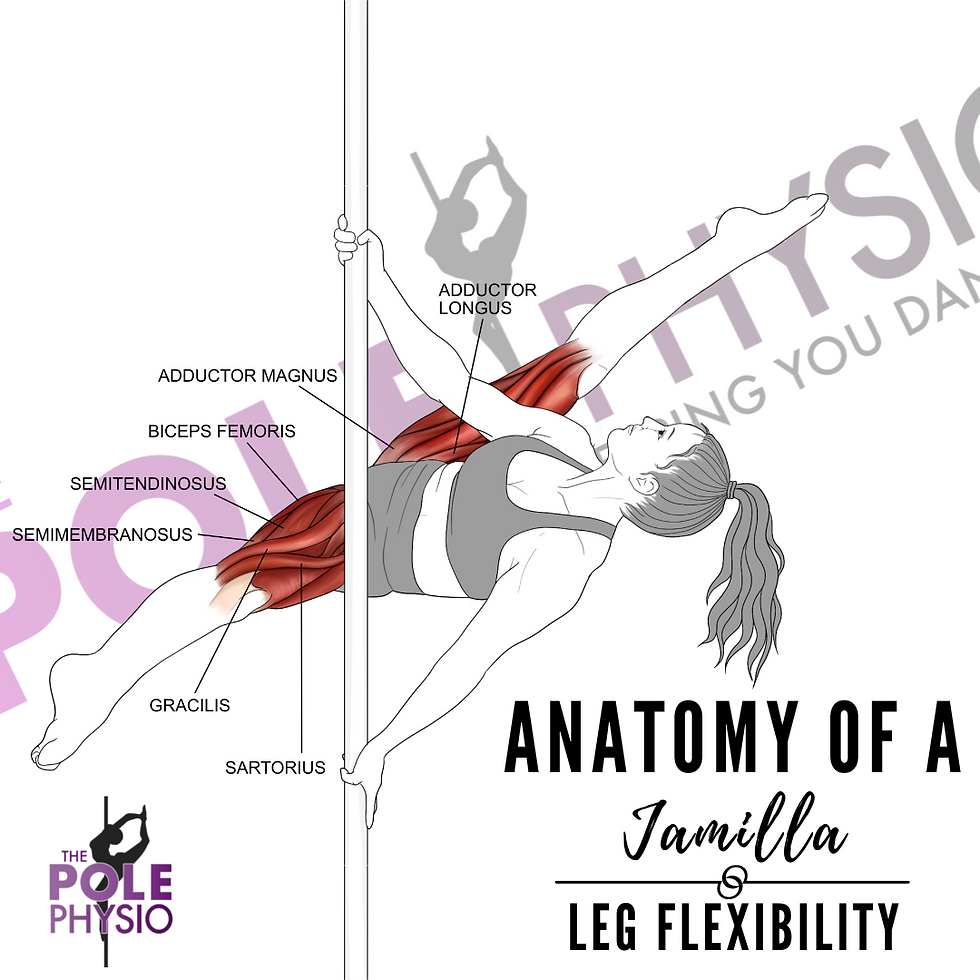
Lastly, where would we be without flexibility of our hamstring & adductor muscles in our Jamilla? Honestly… probably still on the ground! With our legs lifted towards our toro, we require out least 90 degrees of hamstring flexibility to maintain this position. Any less than that and our centre of gravity shifts forward in front of the pole and we will find it very challenging to maintain our Jamilla position.
Whilst a super wide straddle is not needed to perform a Jamilla, the wider the straddle, the more aesthetically pleasing the move. So, whilst not a necessity, adductor flexibility greater than 90 degrees is ideal to have.
Transitions – level up!
Now we all know the Jamilla is a great move, and as a foundational trick expect that you’ll be doing this many more times in your pole career. Our Jamilla is one of the many ways we can transition into our Ayesha, either via ankle hook (extended butterfly) or through a muscle up (hunter press). And it is a favourite entry into our superman too! So put the effort into getting this move fabulous now, because trust us when we say you’re going to need it a lot more later on.
Screening for our Jamilla
Did you know that screening for moves helps us nail our moves quicker and reduces our risk of injury! Now you know what our Jamilla entails, let’s see if your body is ready to handle the demands of this move!
Here’s what we would recommend to screen for a Jamilla:
Baseball grip knee tuck
Split grip knee tuck/cradle
Pushing strength (Kneeling pushup x 5-10)
Pulling strength (Inverted pole row x 5-10)
Anti-rotation strength (Plank hold x 30 seconds)
Upright seated straddle (adductor/hamstring flexibility)
Whilst a Jamilla can be performed without the above being ticked off, it’s highly recommended to work on this first to reduce your risk of injury and nail your Jamilla sooner.
Have you been struggling to nail your Jamilla but not sure why? Or are you experiencing lower wrist or forearm pain?
Online telehealth appointments can be booked with the Pole Physio via our ‘Book Online’ page that can be found here. Assessment and tailored rehabilitation are provided in accordance with best practice and evidence-based treatment to help you unleash your 'poletential'.
Until next time, train safe.
The Pole Physio
x
Please Note:
Any artwork on this or other pages of https://www.thepolephysio.com is copyrighted and is not be reproduced without written permission per the terms of use and conditions.
A Jamilla is a high beginner/low intermediate level trick and conditioning should ONLY be undertaken if your instructor has deemed you ready to work on this trick. This information is general advice only and we are not liable for any injuries that may occur during training.
This page has been created to provide wonderful knowledge with the pole community and sharing of this page to pole friends and pole related facebook groups is actively encouraged.


Odisha Kalia Yojana provides farmers with financial aid, crop insurance, and livelihood support to strengthen rural development.
Balance your studies with ease. matlab homework help provides expert assistance in coding and assignments, while essaypro helps with essays and papers. Both trusted platforms work together to help students succeed in every subject area.
Wakad Wagholi Viman Nagar Vishrantwadi Shivajinagar SB Road Ravet Pune best city Pimple Saudagar Pirangut Marunji Nigdi Pashan Pimpri Chinchwad Magarpatta Lohegaon Koregaon Park Kalyani Nagar Kharadi Pune city Service Pune Star Hotel Hinjewadi Pune desire Pune Airport city Akurdi Aundh Balewadi Baner Bavdhan Bhumkar Chowk Pune city Chakan Dehu Road Deccan Gymkhana Dhanori best city
Join the community of happy gamers at SteamUnlocked.
Stuck on Connections? These Connections Answers will help you solve today’s puzzle quickly. No registration required—just click and get your hints!