Anatomy of an Inside Leg Hang and Flatline
- Simone Muscat

- Apr 1
- 7 min read
Updated: Apr 6
We know this anatomy blog has been a long time coming — and we’re so excited it’s finally here! Welcome back to our anatomy series, where in this blog we’re diving deep into the inside leg hang (also known as Scorpio) and the flatline. These are absolute foundation skills for pole dancers, and trust us — you’ll be using them again and again throughout your pole journey.

Key gripping points of an inside leg hang
An inside leg hang relies on three primary contact points with the pole:
The knee pit
The waist
The back of the shoulder/armpit
To perform this skill safely and effectively, we need:
A controlled and confident entry (straddle or jasmine)
Hip abduction and external rotation of the hooking leg
Knee flexion of the hooking leg
Strength through the hamstrings and adductors
Hip extension of the free (non-hooked) leg
Adequate spinal extension mobility
Flexibility through the quadriceps, iliopsoas and abdominals
Shoulder horizontal extension strength and range
Calf strength in both legs — because yes, we still want that beautiful point
Before breaking down the movement itself, let’s first talk about how to enter and exit this skill safely.
Entry to our inside leg hang
When learning leg hooks for the first time, our preferred entry is from a straddle. This approach builds the pole strength, coordination, and body awareness needed to link these movements together smoothly. That said, if a straddle isn’t accessible yet, working with your instructor to enter via a figurehead or jasmine is a great alternative.
Also it’s helpful to know one of the biggest challenges dancers face when learning inside leg hangs is managing skin discomfort while also achieving a deep and secure hook — and that’s completely normal. So take your time when learning – we encourage practising lying on the floor to begin.
So let’s talk about that hook.
You don’t need to be a physio to notice that an inside leg hang places greater demands on the hip compared to an outside leg hang. In an outside leg hang, the torso can rotate slightly toward the pole, allowing the rotation to be shared between the spine and the hip joint. This reduces how much external rotation is required at the hip.
In contrast, the inside leg hang positions the pole firmly against the waist on the same side as the hooking leg. This limits our ability to rotate through the spine and effectively locks the pelvis facing upward. While a small amount of spinal rotation may occur, it doesn’t meaningfully assist with the hook.
As a result, the hip must do almost all of the work. This is why the inside leg hang requires significantly more external rotation and some hip abduction to create a deep, secure knee pit grip. Without this range, the hook simply won’t feel stable.
Exiting our inside leg hang
When you’re first learning this skill, we recommend exiting by switching back into an outside leg hang, then sliding down to the floor via a crucifix handstand. Another option is to sit up from the inside leg hang, place both hands back on the pole, pull strongly with the arms to release the hook, and unfold into a straddle.
That leg switch might feel clunky at first, but it becomes an incredibly useful transition as you progress into higher levels.
Alright — now let’s break down the anatomy behind this movement.
Gripping Leg/Inside Leg
Hip external rotation
Starting with the hooked leg, you may notice that the knee and foot aren’t aligned straight like the free leg. This is because the hip of the gripping leg is positioned in external rotation.

Hip external rotation is driven primarily by the deep gluteal and hamstring muscles, including:
Gluteus maximus
Quadratus femoris
Obturator internus and externus
Piriformis
While these muscles are actively working, the internal rotators - mainly the adductors and gluteus minimus/medius - are being placed on stretch. Without adequate hip external rotation, the knee pit grip often feels shallow and insecure, increasing the risk of slipping.
Improving your hip external rotation off the pole can make a huge difference to how confident and stable your hook feels on the pole.
If you find yourself hooking with your ankle rather than sitting the pole deep behind the knee, this often points to limited hip abduction or hip flexion range. These restrictions should be addressed off the pole, ideally with guidance from a pole-informed physio, as an insecure hook significantly increases fall risk.

Hamstring strength
Next up - the hamstrings. These muscles at the back of the thigh are responsible for knee flexion, which becomes essential once you’re upside down. After sufficient hip rotation is achieved, hamstring strength (along with skin grip) becomes the primary factor keeping you suspended.
When learning, actively pulling the foot toward the floor helps lock in the knee pit grip. Weak hamstrings can cause the hook to slowly open, leading to a sudden and very unwanted drop. Keep that foot engaged and the knee pit firmly connected to the pole at all times.

Adductor and hip internal rotation strength
Alongside hamstring strength, we also rely on the hip internal rotators and adductors to stabilise the position. These muscles work against the externally rotated hip to maintain control and help keep the pelvis facing the roof.
The also work in co-ordination with the abdominal muscles to keep our pelvis square and facing the roof in the hang.
Gripping points
Earlier we mentioned that an inside leg hang has three main gripping points — however, when learning, we encourage using up to five. How? By using your hands.
Hands provide added safety and allow gradual exposure to the knee pit grip, which — let’s be honest — can be spicy at first. Start with both hands on the pole, then progress to removing the inside arm first, followed by the outside arm as confidence and tolerance build.

Non-gripping Leg/Outside Leg
Hip extension
A very common error we see in beginners is allowing the free leg to float instead of actively reaching it toward the floor. Often this happens because extending the leg increases pressure on the hooked leg and therefore the skin - but this extension is actually crucial for safety.
Extending the hip of the free leg helps reinforce the hook, encourages gentle spinal extension, and improves engagement through the waist and armpit gripping points. All of this increases overall security in the hang.

So please - for the love of pole - keep that free leg reaching downward. It’s absolutely fine if the knee stays bent initially; just prioritise pulling the hip toward the floor.
Hip flexor and abdominal flexibility
Want longer, cleaner lines that look effortless? That comes from flexibility through the abdominals, iliopsoas, and quadriceps. Passive stretching paired with active strengthening will help you achieve that extended knee and beautifully pointed ankle.
Improving quad strength and flexibility will also allow your free leg to lengthen fully, elevating the aesthetic of the entire shape.
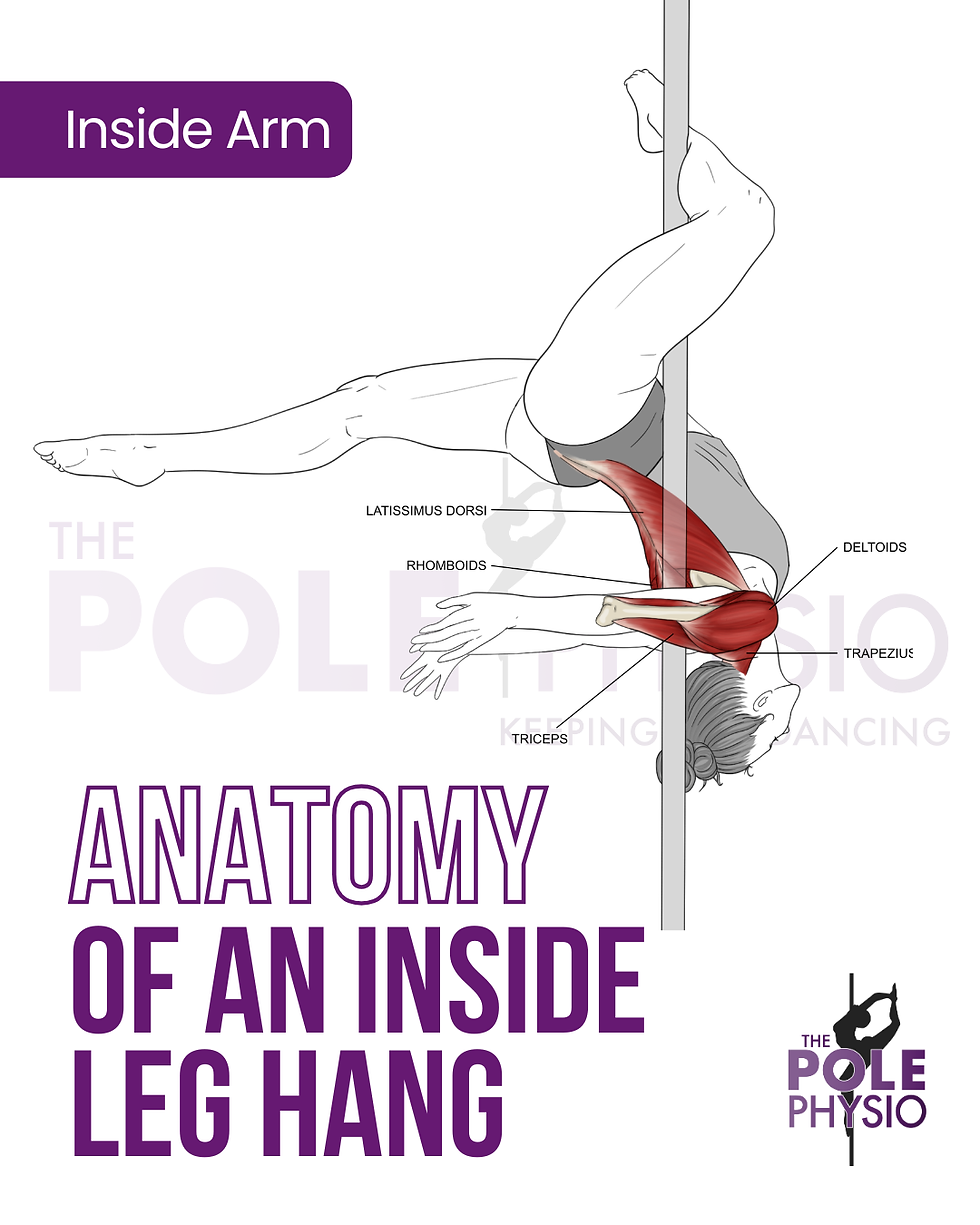
Inside Gripping Arm
Shoulder horizontal extension
The final component to consider is the inside shoulder. For an inside leg hang, we require shoulder horizontal extension strength and mobility. This is provided by the:
Rear deltoids
Rhomboids
Trapezius
Actively pressing the inside arm into the pole can be incredibly helpful when learning, offering extra security and encouraging an open chest position.
But what open the pain??
Just like with the outside leg hang, the discomfort associated with leg hangs improves with time, gradual exposure, and consistent practice. They used to leave me bruised for days — now they’re easy breezy.
One great way to condition the skin safely is by practising the position on the floor. This allows you to build tolerance while refining body awareness and positioning without the risk of height.
Screening
While screening doesn’t perfectly replicate the movement itself, it’s a valuable tool to assess readiness and reduce injury risk. Screening helps ensure we’re not forcing the body into positions it isn’t prepared for yet.
To screen for our inside leg hang we would encourage:
Hip external rotation of the gripping leg
Hamstring strength
Adductor strength
Hip extension of the straight leg
Quad/iliopsoas and abdominal flexibility
Shoulder extension
Thoracic Rotation
A safe and strong entry (straddle or jasmine) and exit (crucifix handstand slide or straddle unfold
Very encouraged but not essential: an outside leg hang.

Anatomy of a Flatline
Wondering how the flatline compares to the inside leg hang? The good news — the anatomy is very similar.
The first key difference is spinal position. In a flatline, the body remains parallel to the floor rather than extending through the spine. This reduces the stretch placed on the abdominals and hip flexors and requires less hip extension from the free leg. Instead, we maintain a gentle abdominal contraction to hold the flatline shape.

Another major difference is load distribution. The flatline is supported by an extended inside arm gripping the pole, which significantly reduces pressure through the hooked leg. While a secure hook is still important, it doesn’t need to be as tight, allowing the leg to sit slightly longer on the pole.
It’s helpful to note that as the inside arm reaches toward the pole, the chest rotates slightly inward. This places the pectorals, anterior deltoid, and biceps on stretch. The bottom arm actively pushes the pole away, while the top arm is free to reach overhead.
The more the chest rotates toward the pole, the less shoulder extension is required. When the chest faces the roof, the shoulder moves into full extension.
Struggling with leg hangs?
Let our team help you. Online appointments can be booked with The Pole Physio here. Assessments and tailored rehabilitation are delivered in line with best practice and evidence-based care to help you unlock your full pole-tential.
Until next time, train safe.
The Pole Physio
x
Please Note:
Any artwork on this or other pages of https://www.thepolephysio.com is copyrighted and is not to be reproduced without written permission per the terms of use and conditions.
An inside leg hang and flatline should ONLY be undertaken if your instructor has deemed you ready to work on this trick. This information is general advice only and we are not liable for any injuries that may occur during training.
This page has been created to provide wonderful knowledge with the pole community and sharing of this page to pole friends and pole related Facebook groups is actively encouraged.


Comments